Are you feeling overwhelmed by the sheer volume of images, videos, and documents cluttering your WordPress Media Library? You’re not alone! Many users find themselves lost in a sea of unorganized media files, making it a challenge to locate the right content when they need it most. But what if we told you there’s a simple way to bring order to that chaos? In this article, we’ll explore how to add media folders in WordPress, transforming your Media Library from a jumbled mess into a well-organized digital haven. Whether you’re a blogger, a business owner, or anyone in between, learning how to categorize and manage your media not only saves you time but also enhances your workflow. Let’s dive in and discover just how easy it can be to keep your media library neat, tidy, and efficient!
Understanding the Importance of Organizing Your Media Library
In the vast digital landscape, a well-organized media library can be the difference between a smooth, efficient workflow and a chaotic, frustrating experience. When you upload images, videos, or documents to your WordPress site, they might seem manageable at first. However, as your collection grows, finding and managing those assets can quickly become overwhelming.
One of the primary reasons to organize your media library is to save time. Imagine you’re working on a blog post and need to find that perfect image you used last year. If your media library is cluttered, it can take precious minutes—or even hours—to dig through the files. With a systematic approach to organization, you can locate your media assets in seconds, allowing you to focus on what truly matters: creating great content.
Additionally, an organized media library enhances your site’s performance. When your media is stored in a structured way, it can lead to faster loading times. Search engines favor websites that load quickly, which means that a tidy media library can have a positive impact on your SEO. By categorizing and optimizing your assets, you’ll not only improve the user experience but also boost your site’s visibility in search engine results.
Here are a few key benefits of maintaining a well-structured media library:
Improved Efficiency: Quickly access and utilize your media files.
Enhanced Collaboration: If you’re working with a team, organization makes it easier for everyone to find and use the right assets.
Better Content Management: Keep track of various versions of images or documents, ensuring you always use the most up-to-date file.
Streamlined Workflow: Reduces distractions and makes your content creation process smoother.
Organizing your media library also allows for easier compliance with copyright laws. By clearly labeling and categorizing your media, you can keep track of licenses, permissions, and attributions needed for each asset. This diligence not only protects you legally but also builds trust with your audience by ensuring all content is properly credited.
To get started, consider implementing a folder structure that aligns with your content strategy. For instance, you might create folders for different categories such as:
Folder Name
Description
Images
All visual assets including photos and graphics.
Videos
All video content, whether it’s promotional or tutorial.
Documents
PDFs, presentations, and any other documents you share.
Backups
Store original or backup versions of your media files.
This method not only provides clarity but also allows for scalability as your media collection expands. You can further enhance your organization by using tags and metadata, making it easier to filter and search for specific files. The more detailed your categorization, the easier it will be to manage your media library as your website grows.
Ultimately, investing time in organizing your media library will pay off in numerous ways—streamlined operations, enhanced creativity, and a better user experience all contribute to the success of your WordPress site. So, roll up your sleeves and start structuring your assets today; your future self will thank you!
Exploring the Default WordPress Media Library Limitations
The WordPress Media Library is a powerful tool, but it does come with its own set of limitations that can hinder your content management experience. While it excels at aggregating images, videos, and documents, it lacks advanced organizational features that many users crave. Understanding these limitations is essential for anyone looking to streamline their workflow and enhance their site’s efficiency.
One of the primary drawbacks is the inability to create folders or subfolders within the Media Library. This means that as you upload more media, it can quickly become a chaotic jumble of files. Finding specific images or documents can feel like searching for a needle in a haystack, especially if your site relies heavily on visual content. Without a structured system in place, it’s easy to lose track of assets or accidentally upload duplicates.
Another limitation is the lack of metadata management tools. While you can add alt text and captions, there’s no built-in functionality for tagging or categorizing media. This is particularly frustrating for larger sites with extensive libraries, where managing media effectively is crucial. Without tags or categories, you might find it challenging to locate assets quickly when you need them for new posts or pages.
Here are a few key limitations to consider:
No folder structure: All media files are lumped together, making it hard to navigate.
Limited search functionality: You can search by title, but not by additional metadata or tags.
Duplication issues: Without a system to check for duplicates, you may end up with multiple copies of the same file.
Manual organization: Users must rely on naming conventions and manual sorting to keep their libraries in order.
Additionally, the Media Library doesn’t provide a way to filter or sort files by type, size, or upload date effectively. This can lead to frustration when trying to manage various file formats. For example, if you have hundreds of images, videos, and PDFs, locating the right file becomes a tedious task without proper sorting options. If you want to enhance your efficiency, having the ability to filter by specific criteria would be a game changer.
Moreover, the visual representation of files can be limiting. While thumbnails provide a quick glance at your images, they don’t convey enough information about larger projects or concepts. If you’re managing a project with multiple related images, it can be difficult to understand how each piece fits into the overall puzzle just by looking at the thumbnails.
Feature
Current State
Potential Improvement
Folder Organization
No folders available
Ability to create custom folders
Metadata Tags
Basic metadata only
Custom tagging and categorization
Search Functionality
Title-based search
Advanced search options
File Duplication
No checks for duplicates
Duplicate detection feature
Recognizing these limitations is the first step toward finding solutions that can improve your media management experience. Whether you’re a blogger, a business owner, or a digital marketer, addressing these challenges can save you time and boost your productivity. With the right tools, you can transform your Media Library into a well-organized, efficient hub for all your content needs.
Benefits of Using Media Folders for Your WordPress Site
Managing a WordPress site can sometimes feel like trying to find a needle in a haystack, especially when your media library starts overflowing with images, videos, and documents. This is where media folders come into play, transforming chaos into a neatly organized library that makes your workflow smoother and more efficient.
One of the key benefits of using media folders is enhanced organization. You can categorize your files into specific folders based on projects, dates, or content types. For example, separating images for different blog categories or organizing files by year can save you countless hours when searching for that one perfect image. Imagine a folder structure that looks like this:
Folder Name
Contents
Blog Posts
Images and media for blog articles
Products
Photos and videos for product listings
Promotions
Assets for marketing campaigns
Another advantage is improved site performance. A disorganized media library can slow down your website, as WordPress has to sift through countless files to retrieve what you need. By organizing your media into folders, you streamline the retrieval process. This can lead to faster load times, which is crucial for user experience and SEO. A well-optimized site not only retains visitors but also ranks better in search engines.
Using media folders also enhances your team collaboration. If you’re working with multiple contributors, having a clear structure in your media library means everyone can quickly find and upload their assets without duplication or confusion. This fosters better teamwork and ensures that everyone is on the same page, literally and figuratively.
Furthermore, media folders allow for simplified maintenance. It’s much easier to perform tasks like updates, backups, and clean-ups when your media library is orderly. You can quickly identify outdated files that can be removed or updated, keeping your site fresh and relevant without the clutter. This proactive approach minimizes potential issues down the line, allowing you to focus on creating content rather than managing files.
Lastly, let’s not overlook the aesthetic appeal. A well-organized media library not only functions better but looks more professional as well. This can be especially important if you’re managing a client’s website or working in a team environment. A neat library reflects on your professionalism and attention to detail, giving clients and colleagues confidence in your capabilities.
investing in media folders for your WordPress site is not just a matter of aesthetics; it’s a powerful strategy for boosting efficiency, performance, and collaboration. When your media library is organized, you can focus more on creativity and less on searching, unlocking your site’s true potential.
Choosing the Right Plugin for Media Organization
When it comes to enhancing your WordPress media library, selecting the right plugin can make all the difference. With numerous options available, it’s essential to choose a plugin that effectively meets your needs for organization and accessibility. Here are some critical factors to consider:
User-Friendliness: The ideal plugin should have an intuitive interface that allows you to easily create and manage folders without a steep learning curve.
Compatibility: Ensure the plugin works seamlessly with your current theme and other plugins. Compatibility issues can lead to frustrating experiences and could even break your site.
Features: Look for features that suit your workflow. Do you need bulk upload capabilities? Are you looking for drag-and-drop functionality? Make a list of your must-have features before deciding.
Support and Updates: A well-supported plugin that receives regular updates is crucial. This ensures that any bugs are promptly fixed, and the plugin remains compatible with the latest version of WordPress.
Another essential aspect to evaluate is the pricing model. While there are plenty of free plugins available, many premium options offer advanced functionality and better support. To help you navigate the costs, consider creating a simple comparison table:
Plugin Name
Price
Key Features
FileBird
Free / $29
Drag & Drop, Multi-File Upload
WP Media Folder
$49
Media Folders, Cloud Integration
Enhanced Media Library
Free / $39
File Types, Custom Taxonomies
Lastly, don’t overlook user reviews and ratings. These insights can provide valuable information on real-world performance and user satisfaction. Look for plugins with consistently high ratings and positive feedback, as they are likely to enhance your media organization experience.
By considering these factors and taking the time to evaluate your options, you’ll be well on your way to selecting a plugin that not only meets your organization needs but also enhances your overall WordPress experience. The right choice can transform your media library from a chaotic collection into a well-structured, easily navigable resource that supports your content creation efforts.
Step-by-Step Guide to Installing a Media Folders Plugin
Installing a media folders plugin for your WordPress site can significantly enhance the organization of your media library. To get started, follow these straightforward steps:
FileBird: A user-friendly option that allows you to create folders and drag-and-drop files.
WP Media Folder: Offers advanced features like automatic folder creation and integration with cloud storage.
Media Library Assistant: Provides robust organizational tools and enhanced search functionalities.
2. Install the Plugin
Once you’ve chosen a suitable plugin, the installation process is simple:
Log in to your WordPress dashboard.
Navigate to Plugins > Add New.
Search for your selected media folders plugin using the search bar.
Click Install Now, and then activate the plugin.
3. Configure Plugin Settings
After activation, it’s time to configure the settings for optimal use:
Go to the plugin’s settings page, usually found in the Media or Settings menu.
Adjust the folder structure preferences according to your workflow.
Enable any additional features that suit your needs, such as file categorization or user permissions.
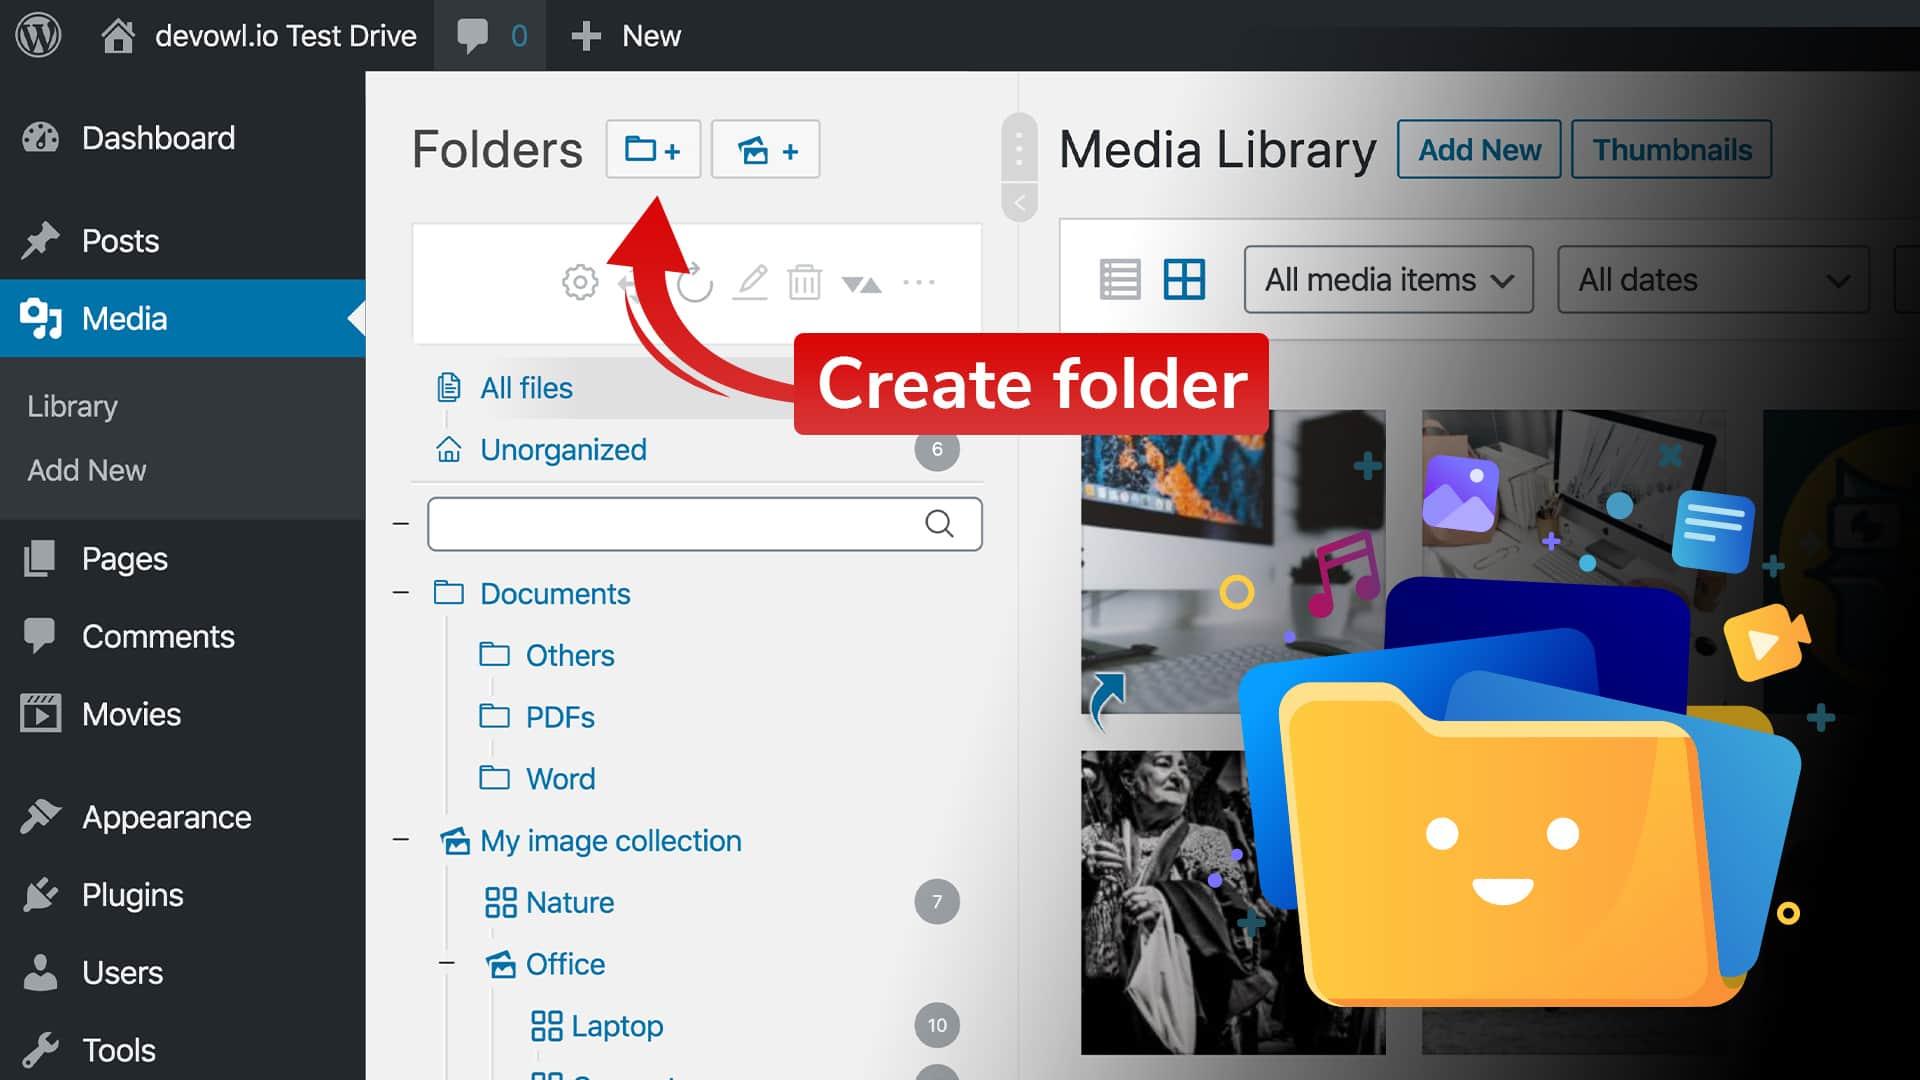
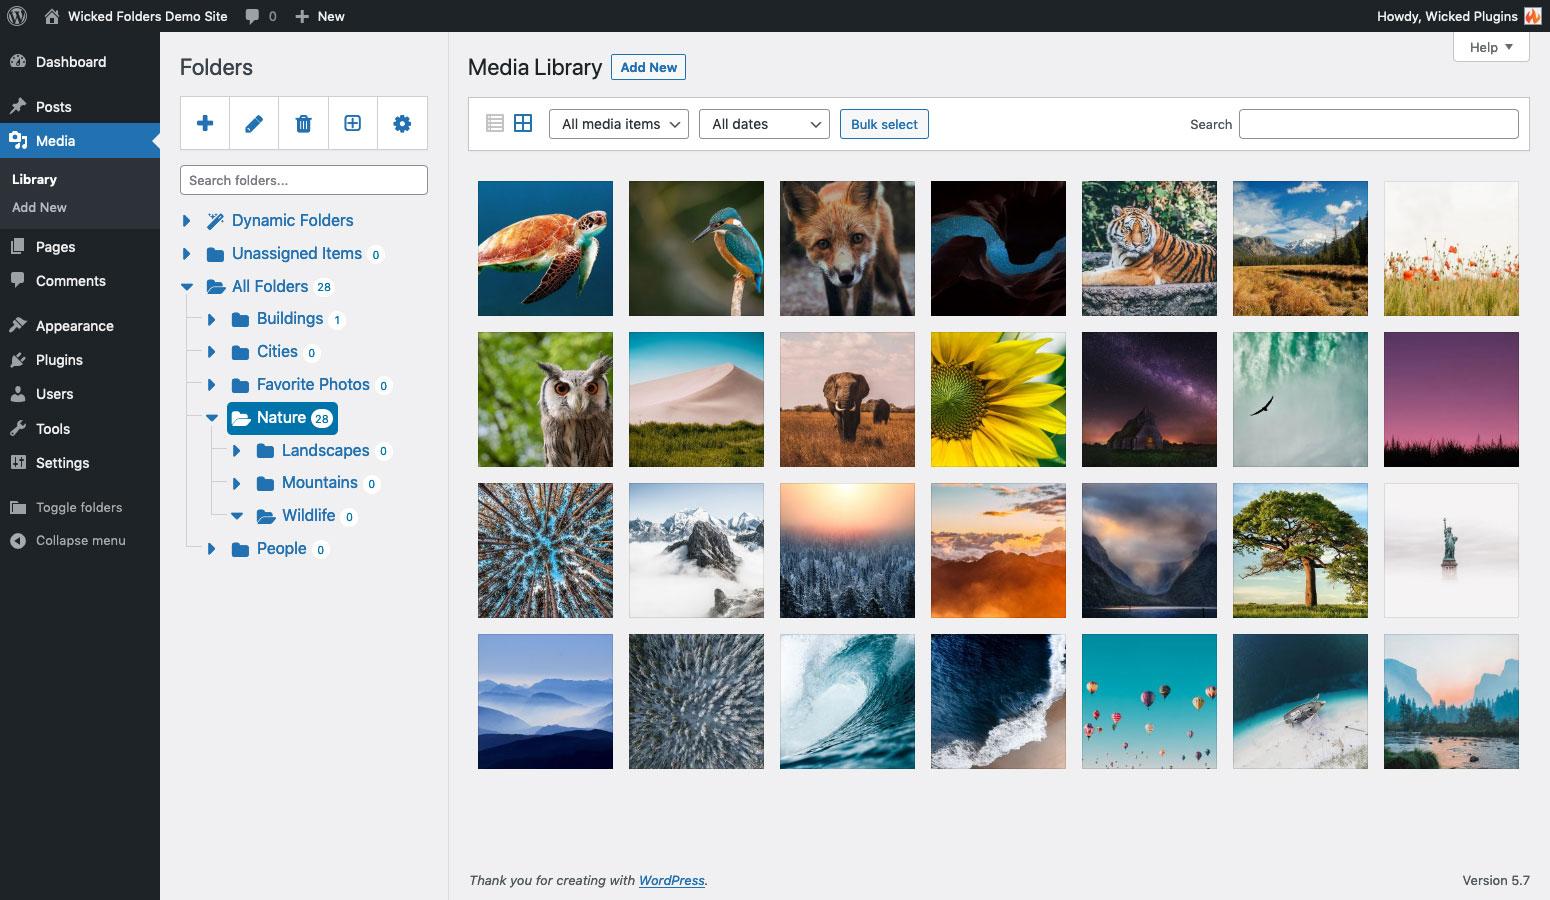
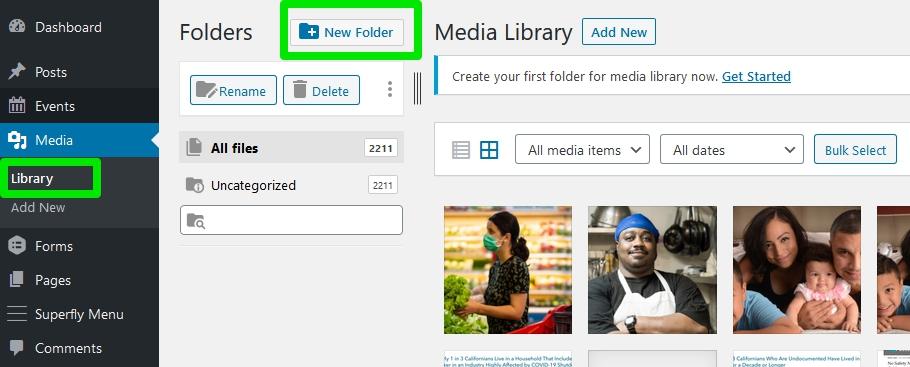
4. Create Folders and Organize Media
With the plugin set up, you can now start organizing your media:
Access your media library from the WordPress dashboard.
Create new folders by clicking the designated button or using the drag-and-drop feature.
Sort existing media files into appropriate folders to enhance accessibility.
5. Optimize for Future Use
To maintain a well-organized media library, consider the following tips:
Regularly review and clean up unused files.
Implement a naming convention for your folders and files for consistency.
Encourage team members to follow the same organizational structure.
6. Troubleshooting Common Issues
If you encounter any issues while using your media folders plugin, here are some common fixes:
Issue
Solution
Plugin not showing folders
Check for conflicts with other plugins or themes.
Unable to drag and drop files
Ensure JavaScript is enabled in your browser and clear your cache.
Folders not saving
Check user permissions and plugin settings.
By following these steps, you can efficiently install and set up a media folders plugin that will make your WordPress media library much easier to navigate. So go ahead, take control of your media organization and enhance your workflow!
Creating and Managing Folders Like a Pro
When it comes to organizing your media library in WordPress, creating and managing folders can significantly enhance your workflow. Instead of sifting through countless images, videos, and documents, you can categorize them into neatly organized folders. This not only saves time but also allows for a more intuitive management process.
To get started, consider the types of media you regularly upload. You might want to create folders based on:
Project Type: Separate folders for different projects or campaigns.
Media Format: Group similar media types together, like images, videos, and audio files.
Date: Organize your media by year or month for easier retrieval.
Client or Category: If you’re working with various clients, having a folder for each can streamline your process.
Once you have a plan, using a plugin to manage your folders becomes essential. There are several excellent options available that integrate seamlessly with WordPress. Popular choices include:
FileBird: A user-friendly plugin that allows drag-and-drop functionality.
WP Media Folder: Offers advanced media sorting capabilities and supports external storage.
Media Library Assistant: A powerful tool that makes organizing large libraries a breeze.
After installing your chosen plugin, take the time to set up your folder structure. It’s best to do this in one go to avoid confusion later. As you create folders, remember to:
Consistently name folders for clarity.
Use keywords in folder names that make sense to you and your team.
Periodically review and adjust your folder structure as your media library grows.
To further enhance your media management, consider adding metadata or tags to your media files. This additional information can be invaluable when searching for specific items later. By utilizing both folders and tags, you create a robust system that allows for quick access to your media files.
Plugin Name
Features
Price
FileBird
Drag-and-drop, customizable folders
Free & Premium options
WP Media Folder
Advanced sorting, external storage support
Premium
Media Library Assistant
Taxonomies, custom fields, bulk management
Free
Lastly, don’t forget to back up your media library periodically. No one wants to lose their hard work due to unforeseen issues. Many plugins offer backup solutions, but you can also use external tools for added security. By establishing a routine for managing your folders and backing up your files, you’ll be well on your way to mastering your WordPress media library.
Tips for Efficiently Uploading Media to Specific Folders
Uploading media to specific folders in WordPress can dramatically enhance your workflow and keep your media library organized. Here are some practical tips to help you streamline the process:
Utilize Plugins: Leverage plugins like WP Media Folder or Media Library Organizer to categorize and manage your files seamlessly. These tools allow you to create folders and subfolders, making it easy to find your images when needed.
Plan Your Folder Structure: Before uploading, sketch out a folder structure that works for your needs. Consider organizing by categories such as Blog Posts, Products, or Events. This foresight prevents chaos later on.
Use Descriptive File Names: Always rename your files with descriptive names that reflect their content. Instead of “IMG_1234.jpg,” use “product-launch-event-2023.jpg.” This practice not only aids in identification but also improves SEO.
Upload in Batches: Instead of uploading one file at a time, batch your uploads. Group similar files together, which can save time and reduce the chances of missing something essential.
Leverage the Media Uploader: Familiarize yourself with the WordPress media uploader. Use the drag-and-drop feature to quickly add multiple files to your selected folders.
When trying to upload efficiently, remember that the organization is key. The right folder structure can help you save precious time when you need to find or edit your media. Here’s a simple table to illustrate a possible folder setup:
Folder Name
Purpose
Blog Images
Images for blog posts and articles
Product Photos
High-quality images for e-commerce
Event Media
Photos and videos from events
Social Media
Assets created specifically for social platforms
Lastly, always keep backups of your media files outside WordPress. This not only safeguards your content but also allows for easier migration to new systems or themes in the future. By following these tips, you can ensure that your media library remains tidy, making your WordPress experience much more enjoyable and efficient.
How to Move Existing Media Files into Folders
Moving your existing media files into organized folders in WordPress can drastically improve your workflow and efficiency. With a few simple steps, you can transform a chaotic media library into a well-structured and easily navigable space. Let’s dive into how you can accomplish this!
First, you’ll need to access your WordPress media library. Head to Media > Library in your WordPress dashboard. Here, you’ll find all your existing media files. To streamline your organization process, consider the following:
Identify Categories: Decide on the main categories you want to create for your media. These could be based on content type, such as images, videos, or documents, or specific projects and campaigns.
Assess Your Current Files: Take time to browse through your media library and get a sense of what you have. Identify which files fit into which categories.
Use a Plugin: There are several plugins available, such as WP Media Folder or FileBird, that can simplify the process of moving files into folders.
If you opt for a plugin, installation is generally straightforward. Once you have your chosen plugin activated, you can start creating folders. Most plugins will allow you to:
Create new folders and subfolders
Drag and drop files into these folders
Rename or delete folders as needed
For those who prefer a more manual approach, you can still categorize your media files without plugins. Here’s how:
Upload New Files into Folders: Always upload new files directly into their designated folders.
Rename Existing Files: If you can’t move files instantly, consider renaming them with relevant keywords or dates to help you recall where they belong.
Regularly Review Your Library: Set a schedule to review and reorganize your media library regularly, ensuring everything stays in its proper place.
As you organize your media files, consider creating a simple table to keep track of which files are in which folders. Here’s a sample layout:
Folder Name
File Types
Number of Files
Images
JPG, PNG, GIF
124
Videos
MP4, AVI
35
Documents
PDF, DOCX
20
By implementing these strategies, you can significantly increase the efficiency of your media library management. Remember, a well-organized library not only helps you find files quickly but also enhances the overall productivity of your WordPress site. So start moving those files into folders today and enjoy a cleaner, more organized media library!
Best Practices for Naming and Structuring Your Media Folders
When it comes to organizing your media library in WordPress, the way you name and structure your folders can make a huge difference in your workflow. A well-organized library not only saves you time but also helps maintain a professional appearance on your website. Here are some best practices to consider:
Be Descriptive: Use clear and descriptive names for your folders. Instead of generic labels like “Images” or “Documents,” try names that reflect the folder’s content, such as “Product Photos” or “Blog Graphics.” This makes it easier for you to find what you need.
Use Date Formats: For folders that contain time-sensitive materials, incorporate dates into the folder names. A format like “2023-10-15_ProjectAssets” clarifies when the content was created and can help with version control.
Consistent Naming Conventions: Stick to a consistent naming convention across all folders. Whether you opt for hyphens, underscores, or camel case, make sure to use the same style throughout to avoid confusion.
Limit Folder Depth: While it’s tempting to create multiple subfolders, too many layers can make navigation cumbersome. Aim for a flat structure where possible and only use subfolders for major categories.
Consider utilizing a color-coded system or emojis in folder names for a visual cue; however, be cautious as excessive use can become distracting. Here’s a straightforward table to illustrate effective folder structuring:
Folder Name
Description
2023-10_Promotions
Contains promotional graphics for October 2023 campaigns.
Blog_Images_Recipes
Images used for recipe blog posts.
Client_Projects
Visual assets related to specific client projects.
Additionally, don’t forget to keep your folders up to date. Regularly review and remove unused files or folders to avoid clutter. This habit not only maintains organization but also improves loading times for your website.
consider utilizing plugins that enhance the media library functionalities. Some plugins allow you to create folders and subfolders without affecting your media management practices. They often come with advanced features like bulk file renaming and search filters, making your media library even more efficient.
Enhancing Your Workflow with Media Organization
When it comes to managing your WordPress media library, efficiency is key. A cluttered media library can slow down your workflow and make it harder to find the files you need. By adding media folders, you can streamline your organization and enhance your productivity. Here’s how to do it effectively.
First off, consider the types of media you’ll be managing. Images, videos, audio files, and documents are commonly used in most websites. By creating folders for each category, you not only create a cleaner workspace but also make it easier for anyone on your team to find what they need. Here’s a simple way to categorize:
Images – Subdivide into further categories like “Banners,” “Thumbnails,” and “Gallery”
Videos – Organize by “Promotional,” “Tutorials,” and “Events”
Documents – Group by “Reports,” “Brochures,” and “E-books”
Next, consider using a plugin to help manage these folders. There are many options available that integrate seamlessly with WordPress, allowing you to create, rename, and delete folders right from the media library interface. This eliminates the need for external tools and keeps everything in one place, which is essential for maintaining your workflow. Popular plugins include:
WP Media Folder – Offers a drag-and-drop interface for easy management.
FileBird – Great for creating folders without any coding required.
Media Library Organizer – Helps with bulk management and categorization.
Additionally, be mindful of naming conventions. A well-structured naming system can make a huge difference in locating files quickly. Here’s a quick guide:
Type of Media
Recommended Naming Format
Images
keyword-description-datetime.jpg
Videos
event-title-datetime.mp4
Documents
type-keyword-datetime.pdf
After setting up your folders and naming conventions, it’s time to move files around. Take some time to go through your existing media library and categorize old files. This may seem tedious, but the long-term benefits will outweigh the initial effort. Think of it as spring cleaning; once completed, you’ll feel a sense of accomplishment and have a cleaner workspace.
Lastly, regular maintenance is crucial. Schedule periodic reviews of your media library to ensure it remains organized. This could be a monthly task where you check for outdated files, duplicate images, or anything that can be archived. Keeping your media library in check will save you valuable time in the future.
Troubleshooting Common Issues with Media Folders
Organizing your media library into folders can drastically improve your workflow, but sometimes you may run into a few bumps along the way. Let’s explore some common issues and how to resolve them, ensuring that you can maximize the potential of your media folders.
Missing Media Files
If you notice that some media files are missing after organizing your folders, don’t panic. This can happen for a couple of reasons:
Incorrect File Path: Ensure that your media files are still linked correctly by checking the file paths in the media library.
Database Caching: Sometimes, a caching issue can cause discrepancies. Clear your site’s cache to see if that rectifies the problem.
Folder Permissions
Folder permissions are crucial for ensuring that your media files are accessible. If you encounter a permissions issue:
Check Permissions: Use an FTP client to verify that your media folders have appropriate permissions set (usually 755 for folders and 644 for files).
Contact Hosting Support: If you’re unsure about changing permissions, reach out to your hosting provider for assistance.
Inability to Upload Files
Sometimes, you might find that you can’t upload files to your media folders. Here’s how to troubleshoot this issue:
File Size Limit: Verify if the file size exceeds your upload limit. You can increase this limit in your php.ini file or contact your host.
File Type Restrictions: Check if the file type you are trying to upload is allowed in your WordPress settings.
Media Library Not Displaying Folders
If your media library is not displaying the folders you’ve created, you might need to adjust a few settings:
Plugin Conflicts: Disable any plugins that might interfere with media management to see if that resolves the issue.
Theme Compatibility: Ensure your active theme supports media folders; switching to a default theme temporarily can help identify issues.
Performance Issues
Adding folders can sometimes slow down your media library. To enhance performance:
Optimize Images: Use image optimization plugins to reduce file sizes without sacrificing quality.
Limit Folder Depth: Avoid creating too many nested folders, as this can complicate access and loading times.
Table of Common Errors and Fixes
Error
Possible Fix
Missing Files
Check file paths and clear cache
Upload Issues
Verify file size limits and types
No Folder Display
Disable conflicting plugins and themes
Performance Lags
Optimize images and limit folder depth
By addressing these common issues, you can ensure a smoother experience while managing your media library in WordPress. Don’t let small obstacles keep you from enjoying the organizational benefits of media folders!
Keeping Your Media Library Clean and Up to Date
Organizing your media library is essential for maintaining a smooth workflow and ensuring that you can quickly find the assets you need. A cluttered library can lead to wasted time and frustration, so let’s explore some effective strategies to keep your media files in check.
First and foremost, create a structured folder hierarchy. By categorizing your media into specific folders based on topics, projects, or types of media, you’ll save yourself from endlessly scrolling through a jumble of files. Here are some folder ideas to get you started:
Images
Product Photos
Blog Post Images
Event Pictures
Videos
Webinars
Promotional Videos
Audio
Podcasts
Background Music
Documents
Reports
Guides
Next, utilize tags and metadata effectively. When you upload a file, take a moment to add descriptive tags and metadata to enhance searchability. This will help you locate files quickly without sifting through every folder. Consider including:
Keywords related to the content
File type (e.g., JPEG, MP4)
Date of upload
Author or creator
Another effective strategy is to regularly review and purge your library. Schedule periodic checks, perhaps every few months, to remove outdated or unused media. Keeping your library lean means you’ll always have room for new content and makes it easier to manage what you have. Consider using the following criteria for purging:
Files that are duplicates
Outdated images or videos that no longer align with your brand
Assets that haven’t been used in a while
If you’re using specific WordPress plugins for media management, take advantage of their features to streamline your organization. Many plugins allow you to create custom folders, sort files by date, and even bulk edit file details, making it easier to keep everything up to date. Here’s a brief comparison of popular plugins:
Plugin Name
Key Features
FileBird
Drag-and-drop folder management, easy sorting
WP Media Folder
Advanced media categorization, full integration with WordPress
Media Library Organizer
Automatic folder creation based on upload date
Lastly, keep your naming conventions in check. Use descriptive names for your files, avoiding generic titles like “image1.jpg” or ”video2.mp4.” Instead, opt for clear, concise names that reflect the content, making it easier to identify the file at a glance.
By implementing these strategies, you can ensure your media library remains organized, accessible, and up to date. A clean library not only enhances your work efficiency but also allows for a more professional presentation of your content.
Making the Most of Your Organized Media for SEO
Organizing your media library isn’t just about aesthetics; it plays a crucial role in how well your content performs in search engines. When your media files are neatly categorized, you enhance not only user experience but also the SEO potential of your site. Here are some tips to leverage your organized media for improved SEO results:
Optimize File Names: Before uploading your images and videos, take a moment to give them descriptive, keyword-rich file names. Instead of using generic terms like “image1.jpg,” opt for something more specific, like ”chocolate-cake-recipe.jpg.” This simple adjustment helps search engines understand the content of your files, boosting your chances of appearing in image search results.
Add Alt Text Thoughtfully: Alt text is not just for accessibility; it’s a critical component for SEO. Ensure that each media file has a descriptive alt text that includes relevant keywords. This not only aids visually impaired users but also tells search engines what your images are about, which can enhance your visibility in search results.
Leverage Image Sizing: Large image files can slow down your website, negatively impacting your SEO. Use an image compression tool before uploading your files. Aim for a balance between quality and file size to ensure your site remains fast and responsive. Google favors speed, so make sure your images load quickly to keep your bounce rates low.
Image Size
Recommended Size
Impact on SEO
Hero Images
1200×800 pixels
High quality, supports engagement
Thumbnails
150×150 pixels
Fast loading, improves UX
Content Images
800×600 pixels
Balanced, enhances readability
Utilize Descriptive Captions: Captions are often overlooked, but they provide context to your images, enhancing user engagement. A well-crafted caption can keep readers on your page longer, reducing bounce rates and sending positive signals to search engines. Aim for clarity and relevance to both the image and the surrounding content.
Integrate Internal Links: When you use media within your posts, don’t forget to link back to other relevant content on your site. This can be particularly effective for image links, as they can guide users to related articles, keeping them on your site longer while improving your internal linking structure, which is vital for SEO.
Regularly Audit Your Media Library: As your site grows, so will your media library. Schedule regular audits to remove outdated or unused files. This not only helps keep your library organized but also maintains your site’s speed and efficiency, both of which are crucial for good SEO performance.
Conclusion: Transform Your Media Management Today
Are you tired of sifting through endless files in your WordPress media library? It’s time to take control and streamline your media management! By implementing folders within your media library, you not only save time but also enhance your overall workflow. Imagine the efficiency of quickly locating your images, videos, and documents—all thanks to a well-organized structure.
Utilizing media folders allows you to:
Improve accessibility: Quickly find and manage your files without the hassle of scrolling through countless items.
Enhance collaboration: If you work with a team, clear organization helps everyone stay on the same page.
Boost productivity: Spend less time searching and more time creating and managing your content.
Implementing a folder system is simple. With tools like Media Library Folders or WP Media Folder, you can categorize your uploads by project, type, or date, making it easy to navigate. Organizing your files not only keeps your library tidy but also aids in SEO by allowing you to find and optimize images and videos quickly.
Consider the following table when planning your media organization strategy:
Category
Examples
Benefits
Images
Thumbnails, Banners
Quick access for posts
Videos
Promo Videos, Tutorials
Easy embedding in content
Documents
PDFs, E-books
Streamlined downloads for users
Additionally, consider utilizing tags and categories within your folders. By tagging your media files, you can create an even more powerful search system, allowing you to locate what you need in seconds. This added layer of organization can be a game-changer, especially for larger websites or those with extensive media libraries.
Don’t let your media library become a chaotic mess—transform it into a well-oiled machine that supports your creative efforts. Start today by choosing a folder plugin that suits your needs and begin categorizing your files. Watch as your productivity soars and your stress levels decrease.
By investing a little time in organizing your WordPress media, you’re not just tidying up; you’re crafting a more effective workflow that paves the way for future success. So why wait? Take the plunge and transform your media management experience now!
Frequently Asked Questions (FAQ)
Q&A: How to Add WordPress Media Folders: Organize Your Media Library Better
Q: Why should I organize my WordPress media library? A: Great question! Organizing your media library can save you a ton of time and frustration. Imagine trying to find a specific image among hundreds of files scattered everywhere—it’s overwhelming, right? By adding folders, you can categorize your media (like images, videos, and PDFs) into manageable sections. This not only makes finding what you need easier but also enhances your workflow and overall productivity.
Q: Is it difficult to create folders in WordPress? A: Not at all! While WordPress doesn’t have built-in media folders, there are several user-friendly plugins available that make it a breeze. With just a few clicks, you can set up a folder structure that suits your needs. Trust me, once you start organizing, you’ll wonder how you ever lived without it!
Q: Which plugins do you recommend for managing media folders? A: There are a few standout plugins that can help you out. One popular choice is FileBird, which offers a drag-and-drop interface for easy folder management. Another great option is WP Media Folder, which comes with a ton of features, allowing you to create folders and subfolders seamlessly. Both plugins have user-friendly interfaces that make organization simple, even for beginners!
Q: Can I sort existing media into the new folders? A: Absolutely! Once you’ve installed a media folder plugin, you can easily drag and drop your existing media files into the appropriate folders. This means you can take control of your media library right away and start reaping the benefits of organization without having to upload everything again.
Q: Will organizing my media affect my website’s performance? A: Not at all! In fact, organizing your media can potentially improve your website’s performance. A neatly organized media library can speed up the process of finding and uploading files, which can enhance your content creation workflow. Plus, when you know exactly where your assets are, you’ll waste less time searching, allowing you to focus on creating amazing content for your audience.
Q: What if I change my mind and want to rearrange my folders later? A: No worries! Most media folder plugins allow you to move files around with ease. So if you find that a certain organization strategy isn’t working for you, you can always adjust it to better suit your needs. Flexibility is key when it comes to managing your media!
Q: Any final tips for maintaining an organized media library? A: Definitely! Regularly review and clean up your media library to ensure it stays clutter-free. Delete any duplicates or unused files to keep things tidy. Also, make it a habit to upload new media into the correct folders right away. This proactive approach will save you time and stress in the long run!
Q: How can I get started today? A: You’re just a few steps away! Choose a plugin that fits your needs, install it, and start organizing. Remember, the sooner you begin, the more efficient your media management will become. You’ll love the clarity and ease that comes with a well-organized media library. Happy organizing!
Future Outlook
And there you have it! Organizing your WordPress media library doesn’t have to be a daunting task. By adding media folders, you can streamline your workflow, save time, and make finding that perfect image or video a breeze. Whether you’re a seasoned blogger, an online store owner, or simply someone who loves to share their creativity, investing just a bit of time in sorting your media can pay off in spades.
Remember, a well-organized media library not only enhances your productivity but also helps you maintain a professional appearance on your site. So go ahead, take the plunge! Explore the various plugins and methods we’ve discussed, and start making your media library work for you.
If you have any questions or need further assistance, don’t hesitate to reach out. Happy organizing, and here’s to a more efficient and enjoyable WordPress experience!