Are you ready to dive into the world of blogging or create your very own website? If so, you’re in the right place! Installing WordPress is the first step on your journey to building an online presence, and guess what? It’s easier than you might think! In this article, we’re going to walk you through two simple methods to install WordPress, ensuring you can choose the one that fits you best. Whether you’re a tech-savvy wizard or just starting out, we’ve got you covered with clear, step-by-step instructions. By the end, you’ll be well on your way to crafting a stunning site that showcases your unique voice and vision. So, grab a cup of coffee, and let’s get started on making your digital dreams a reality!
Understanding the Importance of WordPress for Your Website
When it comes to building a website, choosing the right platform is crucial, and WordPress stands out as one of the best options available. It powers over 40% of the web, offering a robust foundation for both personal blogs and complex business sites. Here’s why understanding its importance can significantly influence your online presence.
User-Friendly Interface: One of the greatest advantages of WordPress is its intuitive interface. Even if you lack technical skills, you can easily navigate the dashboard to create, edit, and manage your content. This accessibility allows users to focus on what truly matters—their message and branding.
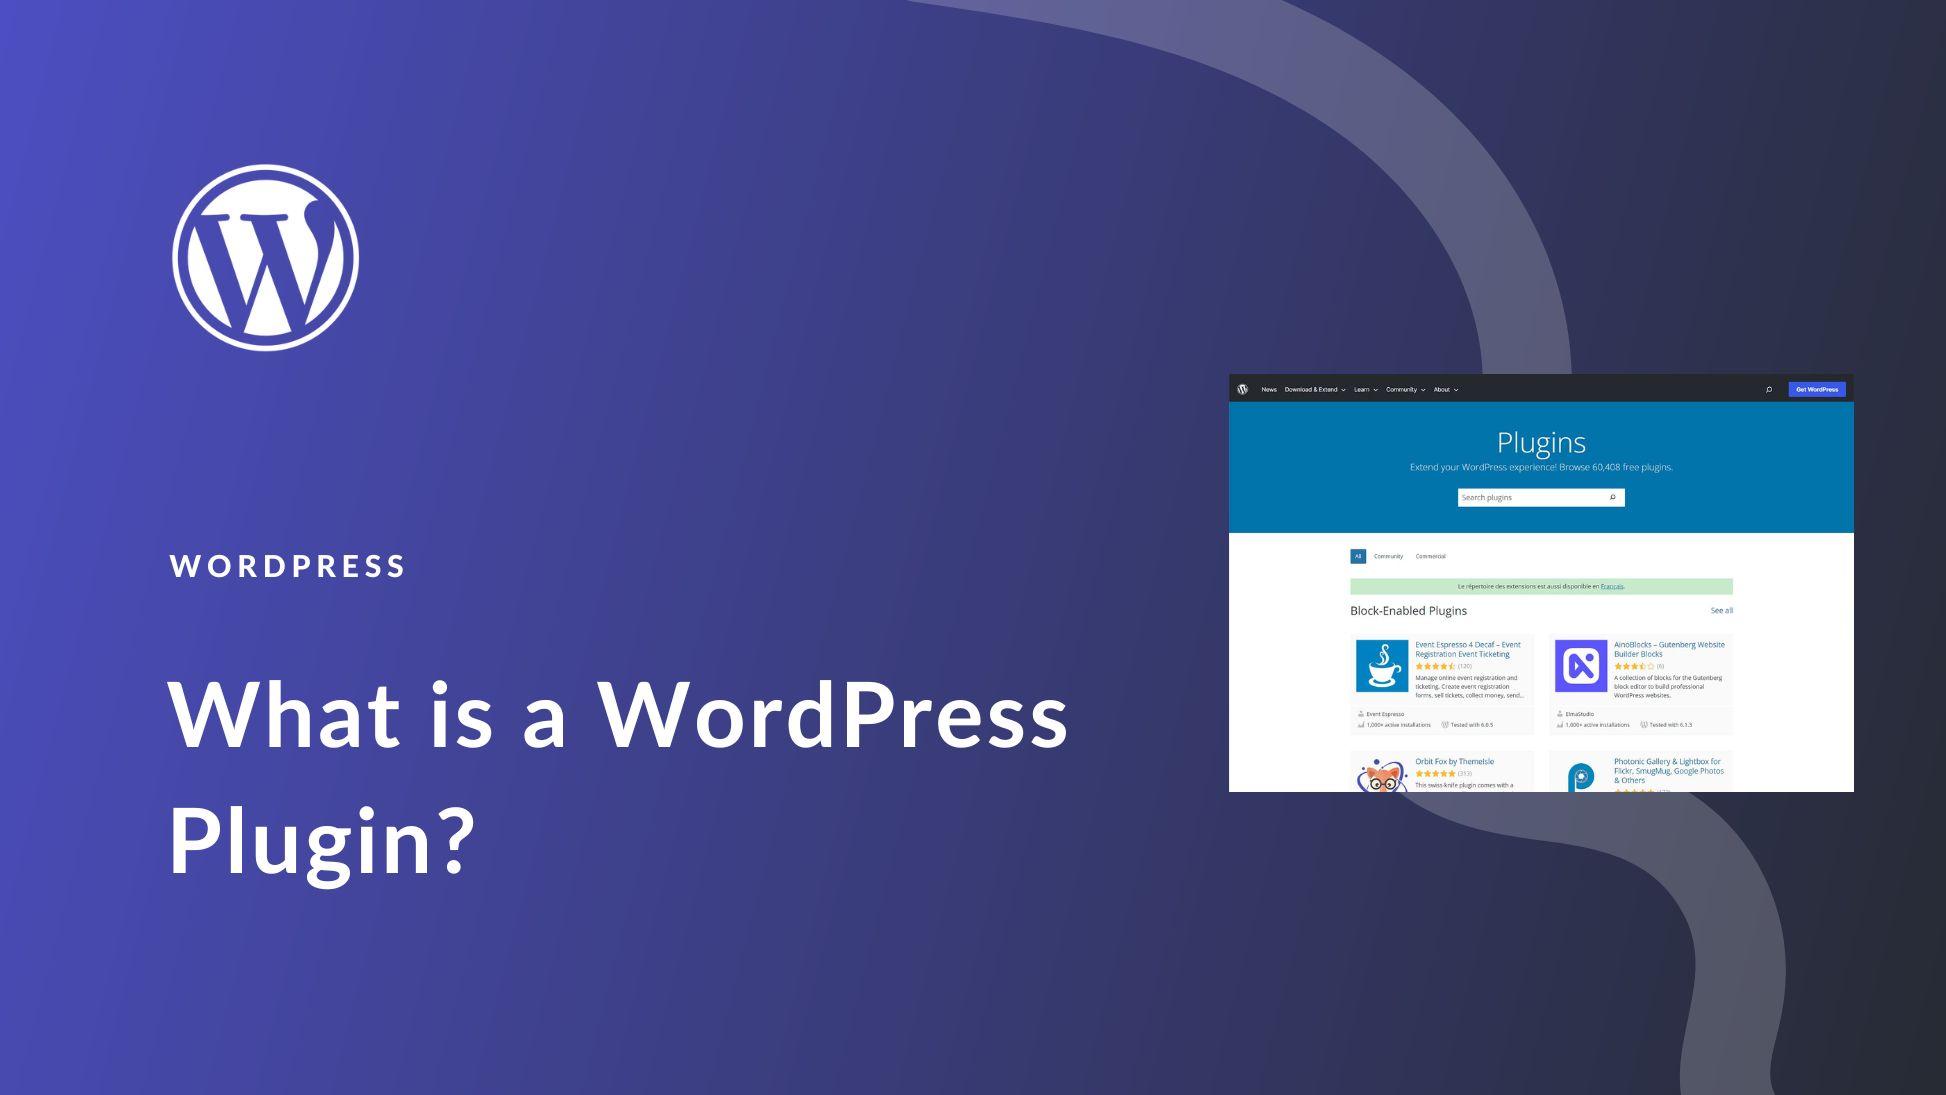
Customization and Flexibility: With thousands of themes and plugins, WordPress offers unparalleled customization options. Whether you want to create a sleek, professional portfolio or a vibrant e-commerce store, you can find numerous themes that suit your vision. Additionally, plugins extend functionality, allowing you to add features like SEO optimization, social media integration, and enhanced security with just a few clicks.
SEO Friendly: Search engine optimization (SEO) is vital for getting your website noticed. WordPress is designed with SEO in mind, providing clean code and various tools to help you optimize your content effectively. By using plugins like Yoast SEO, you can easily improve your visibility on search engines, driving more traffic to your site.
Community and Support: The WordPress community is vast and supportive. From forums to online tutorials, you’ll find a wealth of resources to help you troubleshoot issues or learn new skills. This network means you’re never alone in your journey, and you can tap into the collective wisdom of countless users and developers.
Advantage
Description
User-Friendly
Simple dashboard for easy management
Customizable
Thousands of themes and plugins available
SEO Optimized
Built with SEO best practices in mind
Strong Community
Access to forums and support resources
Security Features: With cyber threats becoming increasingly sophisticated, security is a priority for any website owner. WordPress takes this seriously by providing regular updates and patches. Plus, there are numerous security plugins available, ensuring your site stays safe from potential vulnerabilities.
Scalability: Whether you’re starting small or have plans for growth, WordPress can scale with your needs. You can begin with a simple blog and expand into a full-fledged online store or membership site without needing to switch platforms. This scalability saves time, effort, and resources in the long run.
In essence, embracing WordPress for your website is more than just a choice; it’s a strategic decision that can lead to enhanced user engagement, improved visibility, and long-term success. Understanding its core benefits can empower you to make the most of your online presence and turn your vision into reality.
Choosing the Right Hosting Provider for Your Needs
When it comes to selecting a hosting provider for your WordPress site, making the right choice can significantly impact your website’s performance, security, and overall success. Here are some crucial factors to consider:
Performance: Look for providers that offer high uptime rates, fast loading times, and resources tailored for WordPress. This ensures your visitors have a seamless experience.
Support: Opt for a hosting service with 24/7 customer support. WordPress-specific support can help you troubleshoot issues quickly and efficiently.
Before finalizing your decision, it’s beneficial to read reviews and test the hosting provider’s customer service. Most reputable providers offer a money-back guarantee, allowing you to test their services risk-free.
taking the time to evaluate these factors can lead you to the ideal hosting provider tailored to your unique needs. A solid foundation will set you up for success as you embark on your WordPress journey.
Exploring the Two Main Methods to Install WordPress
When it comes to installing WordPress, you have two primary methods to choose from: automatic installation through your hosting provider and manual installation via FTP. Each approach has its unique advantages, catering to different user experiences and technical know-how.
Automatic Installation is the path of least resistance, especially for beginners. Most hosting providers offer a one-click installation feature that makes setting up WordPress as simple as clicking a button. Here’s what you can expect:
Ease of Use: No technical skills required; just follow the prompts.
Quick Setup: Install WordPress in a matter of minutes.
Updates and Security: Many hosts provide automatic updates and added security features.
To get started with this method, you simply need to log into your hosting account, navigate to the control panel, and look for the WordPress installer icon. Following the on-screen instructions will have you up and running in no time.
On the other hand, if you’re looking to have more control over your installation, or if your hosting provider doesn’t offer the one-click option, the manual installation method via FTP is the way to go. This method is slightly more complex, but it can be very rewarding. Here’s a brief overview of the steps involved:
Download WordPress: Get the latest version from the official WordPress website.
Upload Files: Use an FTP client to upload the WordPress files to your server.
Configure wp-config.php: Edit the configuration file to connect WordPress to your database.
Run the Installation: Visit your domain to complete the installation process.
While this approach takes more time and effort, it gives you greater flexibility and understanding of your WordPress environment. It’s also an opportunity to learn about file management and database configuration, invaluable skills for any website owner.
Method
Pros
Cons
Automatic Installation
Fast and easy
No technical skills needed
Less control
Dependent on host’s features
Manual Installation
Full control
Learning experience
Time-consuming
Requires technical knowledge
Ultimately, the choice between the two methods largely depends on your comfort level with technology and your specific needs. If you want to get started quickly and with minimal fuss, the automatic route is ideal. However, if you’re keen to dive deeper into the world of WordPress and web management, the manual method offers a robust learning experience that can set you up for long-term success.
Method One: Installing WordPress Using a One-Click Installer
Installing WordPress has never been easier, especially with the advent of one-click installers. These tools are designed to simplify the setup process, allowing you to focus more on your content and less on the technicalities of installation. Here’s how you can get started with just a few clicks.
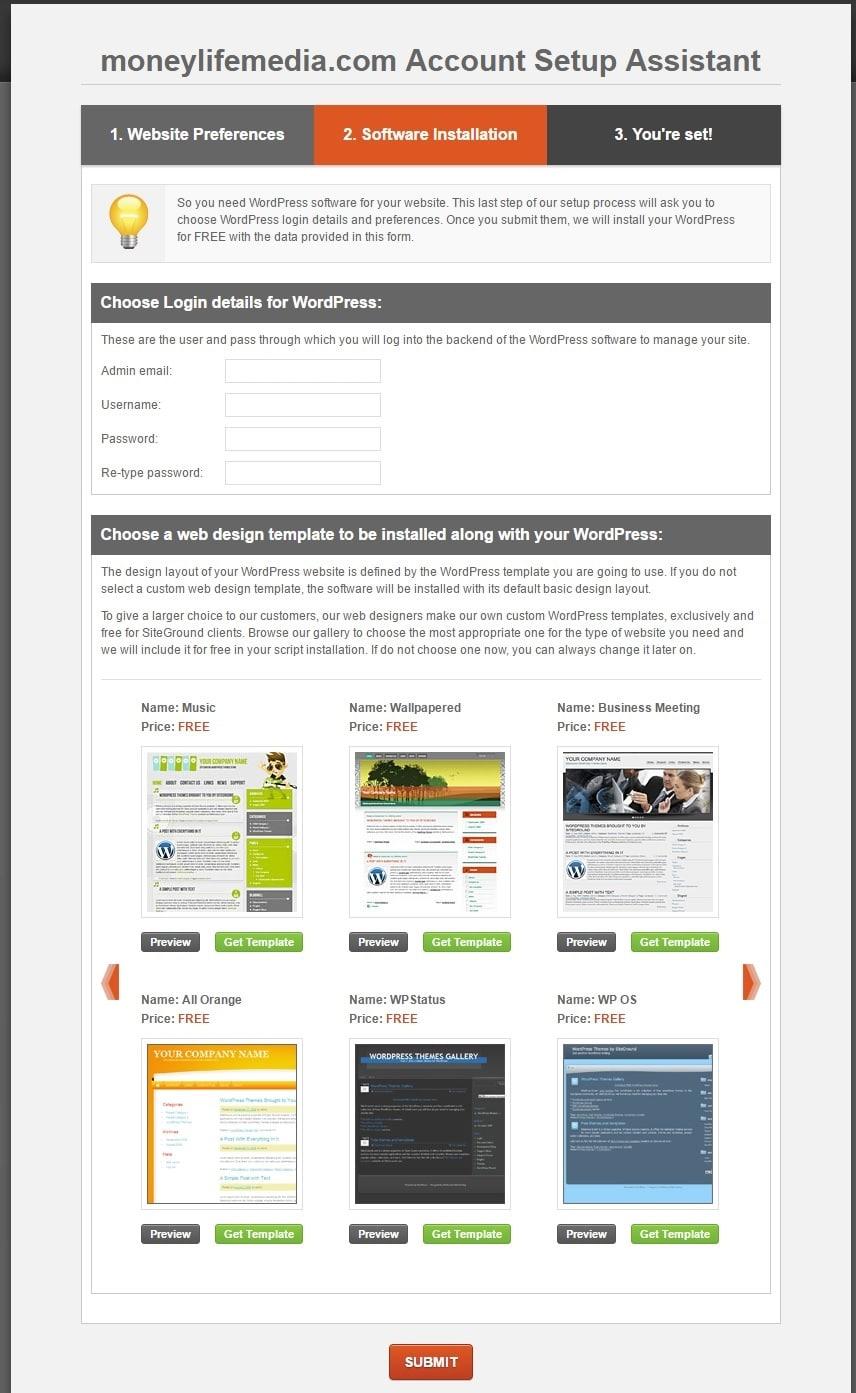
First, log in to your web hosting account. Most reputable hosting providers offer one-click installation options for WordPress. Once you’re in your account dashboard, look for a section labeled “Website”, “Apps”, or “WordPress Installer”. The exact wording may vary depending on your hosting service, but keep an eye out for anything that suggests an easy way to install applications.
Next, you will typically find a button or link that says “Install WordPress” or “One-Click Install”. Clicking this will open a new configuration window where you can customize your installation settings. Here are some key options you might encounter:
Domain Selection: Choose the domain name where you want to install WordPress.
Site Name: Provide a name for your website; this will be displayed in the title bar of web browsers.
Admin Username: Choose a secure username for your WordPress admin area.
Password: Create a strong password to protect your site from unauthorized access.
Email Address: Enter an email that will be used for admin notifications.
After you’ve filled out these fields, double-check all your information for accuracy. It’s crucial to use a strong password to enhance your site’s security. Many installers will even provide a password strength indicator, so be sure to take advantage of that feature.
Once you’ve confirmed your settings, simply click the “Install” button. This process may take a few moments, so be patient. The installer will handle everything for you: setting up the database, configuring files, and installing WordPress.
After the installation is complete, you’ll receive a confirmation message along with a link to your new WordPress site and the admin login page. Bookmark these links for easy access in the future. Typically, the admin login URL will look something like this: http://yourdomain.com/wp-admin.
using a one-click installer is the quickest and most efficient way to get WordPress up and running. With just a few simple steps, you can have a fully functional website ready for customization. Enjoy exploring the world of WordPress and unleash your creative potential!
Navigating the One-Click Installation Process
When it comes to setting up your WordPress site, the one-click installation method is a game changer. This streamlined process makes it incredibly easy for anyone, regardless of technical skills, to get their site up and running in just a matter of minutes. Below, we’ll break down how to navigate this process seamlessly.
First things first, you need to choose a reliable hosting provider that offers one-click WordPress installation. Popular options include:
Bluehost – Officially recommended by WordPress.org.
HostGator – Offers a range of affordable plans.
Once you’ve settled on a hosting provider, the next step is to access your hosting account. After logging in, look for the control panel—this is where the magic happens. You’ll typically find a section labeled “Website” or “WordPress” that will lead you to the one-click installation options.
Now, let’s get into the installation process itself. You’ll usually follow these simple steps:
Select the domain where you want to install WordPress.
Click on the Install button next to the WordPress option.
Fill in the required information, such as your site name, admin username, and password.
hit the Complete Installation button.
After a few moments, you’ll receive a confirmation message that WordPress has been installed. At this point, you can log in to your new site’s admin dashboard using the credentials you just set up. It’s that easy!
If you want to ensure a seamless experience and avoid any hiccups, here are a few tips:
Double-check your domain settings before starting the installation.
Consider enabling automatic updates to keep your site secure.
Familiarize yourself with the dashboard layout to navigate efficiently.
Once you’re inside the dashboard, the real fun begins! You can choose from thousands of themes and plugins to customize your site and enhance its functionality. Whether you’re launching a blog, a portfolio, or an online store, the possibilities are endless.
For those who like a visual summary, here’s a quick overview of the one-click installation process:
Step
Action
1
Choose a hosting provider.
2
Access the control panel.
3
Select the domain for installation.
4
Fill in your site details.
5
Complete the installation.
Embrace the simplicity of one-click installations, and watch your WordPress site come to life in no time!
Setting Up Your WordPress Account After Installation
Congratulations on successfully installing WordPress! Now it’s time to take a few simple steps to set up your account and ensure your site is ready for action. This process is straightforward, and with a little guidance, you’ll be able to navigate through it like a pro.
First things first, you’ll want to log in to your WordPress dashboard. Go to yourdomain.com/wp-admin and enter the credentials you created during installation. Once you’re in, take a moment to familiarize yourself with the interface. The dashboard is your command center, where you can manage every aspect of your site.
Next, it’s crucial to configure your website settings. Head over to the Settings tab in the left-hand menu. Here are some key options to consider:
General: Set your site title, tagline, and timezone. These elements help define your brand and improve SEO.
Reading: Choose what your homepage displays—whether it’s a static page or your latest posts.
Permalinks: Optimize your URL structure for better search engine visibility. A common choice is “Post name.”
Now that your settings are in place, it’s time to enhance your site’s appearance. Visit the Appearance section to browse and install themes. Choose a theme that resonates with your brand. There’s a plethora of free and premium themes available. Make sure to preview them to see how they fit your vision!
Theme Name
Features
Price
Astra
Fast, customizable, and compatible with popular page builders
After selecting a theme, consider adding essential plugins to enhance functionality. Navigate to the Plugins section and search for tools that suit your needs. Some must-have plugins include:
Yoast SEO: Optimize your content for search engines effortlessly.
WooCommerce: Create a fully-functional online store.
Jetpack: Improve site performance and security.
don’t forget to create essential pages like an About page, Contact page, and Privacy Policy. These pages build trust with your audience and provide crucial information. Use the Pages section to add your content easily.
Once you’ve completed these steps, you’re well on your way to launching your WordPress site! With your account set up and your website configured, you can focus on creating amazing content that engages your visitors.
Method Two: Manual Installation of WordPress
Installing WordPress manually might sound daunting, but it’s a straightforward process that gives you full control over your website’s setup. This method is particularly useful if you want to customize your installation or if you’re working with a hosting provider that doesn’t offer a one-click install option. Let’s walk through the steps together!
Before diving into the installation, ensure you have the following:
A Domain Name: This is your website’s address on the internet.
Web Hosting: Choose a reliable hosting provider that supports PHP and MySQL.
FTP Client: Software like FileZilla will help you upload files to your server.
Database Access: You’ll need to create a MySQL database for your WordPress installation.
Step 1: Download WordPress
Head over to the WordPress.org website and download the latest version of WordPress. The downloaded file will be a zip file, so extract it to a folder on your computer. You’ll need these files for the next steps.
Step 2: Upload WordPress Files
Using your chosen FTP client, connect to your web hosting account. Navigate to the root directory (usually called public_html or www) and upload the extracted WordPress files. This could take a few minutes depending on your internet speed.
Step 3: Create a MySQL Database
Access your hosting control panel (often cPanel) and locate the MySQL Databases section. Here, you will:
Create a new database.
Create a new MySQL user.
Assign the user to the database with full privileges.
Take note of the database name, username, and password as you’ll need them during the installation.
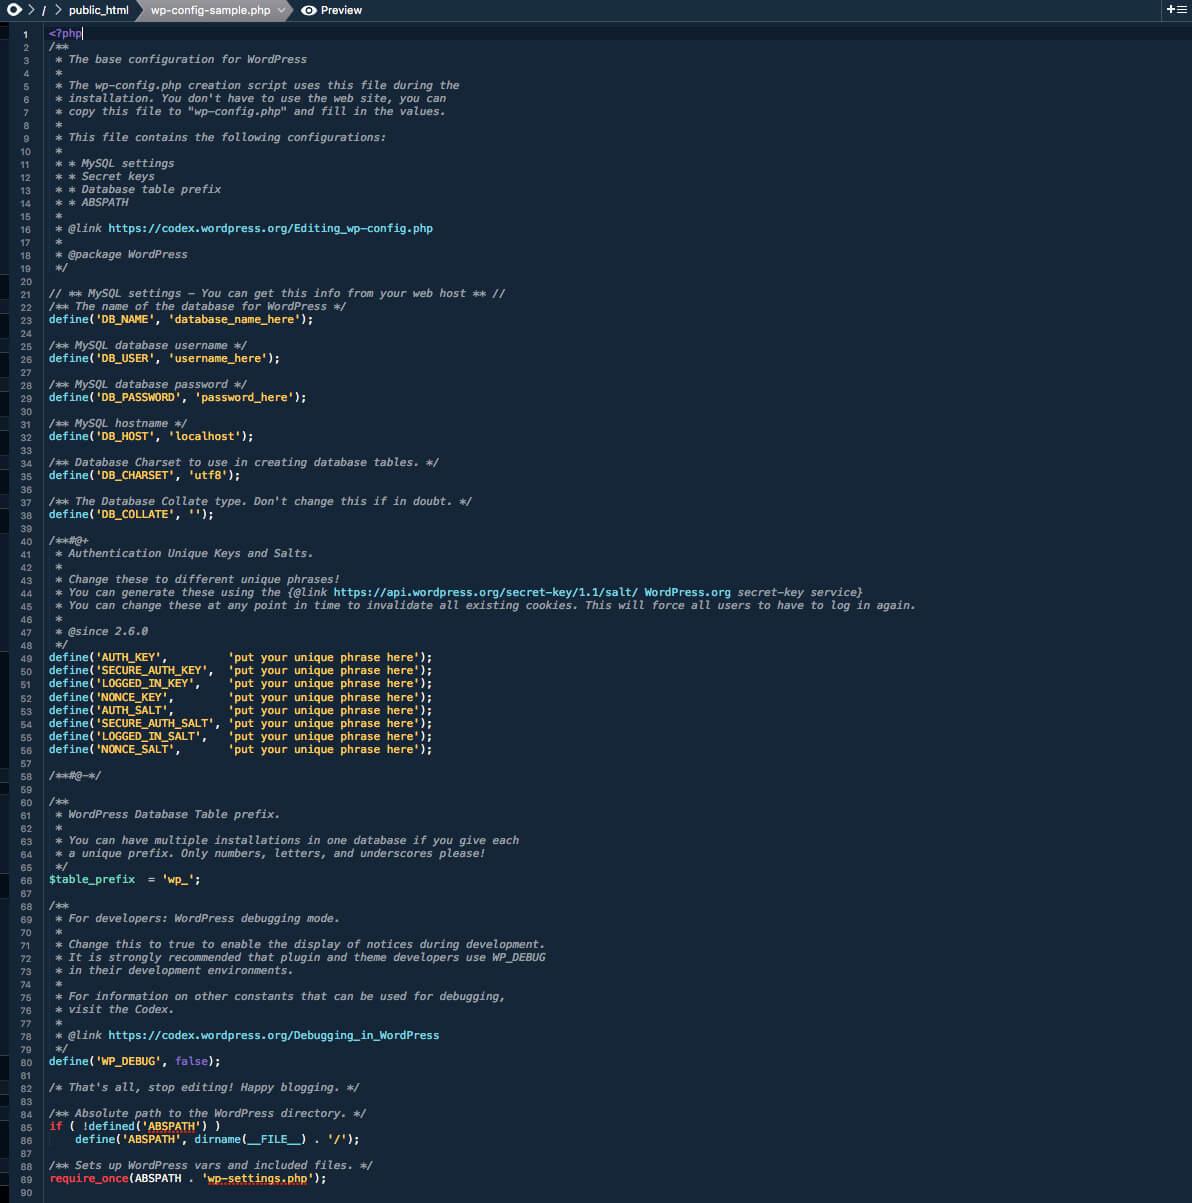
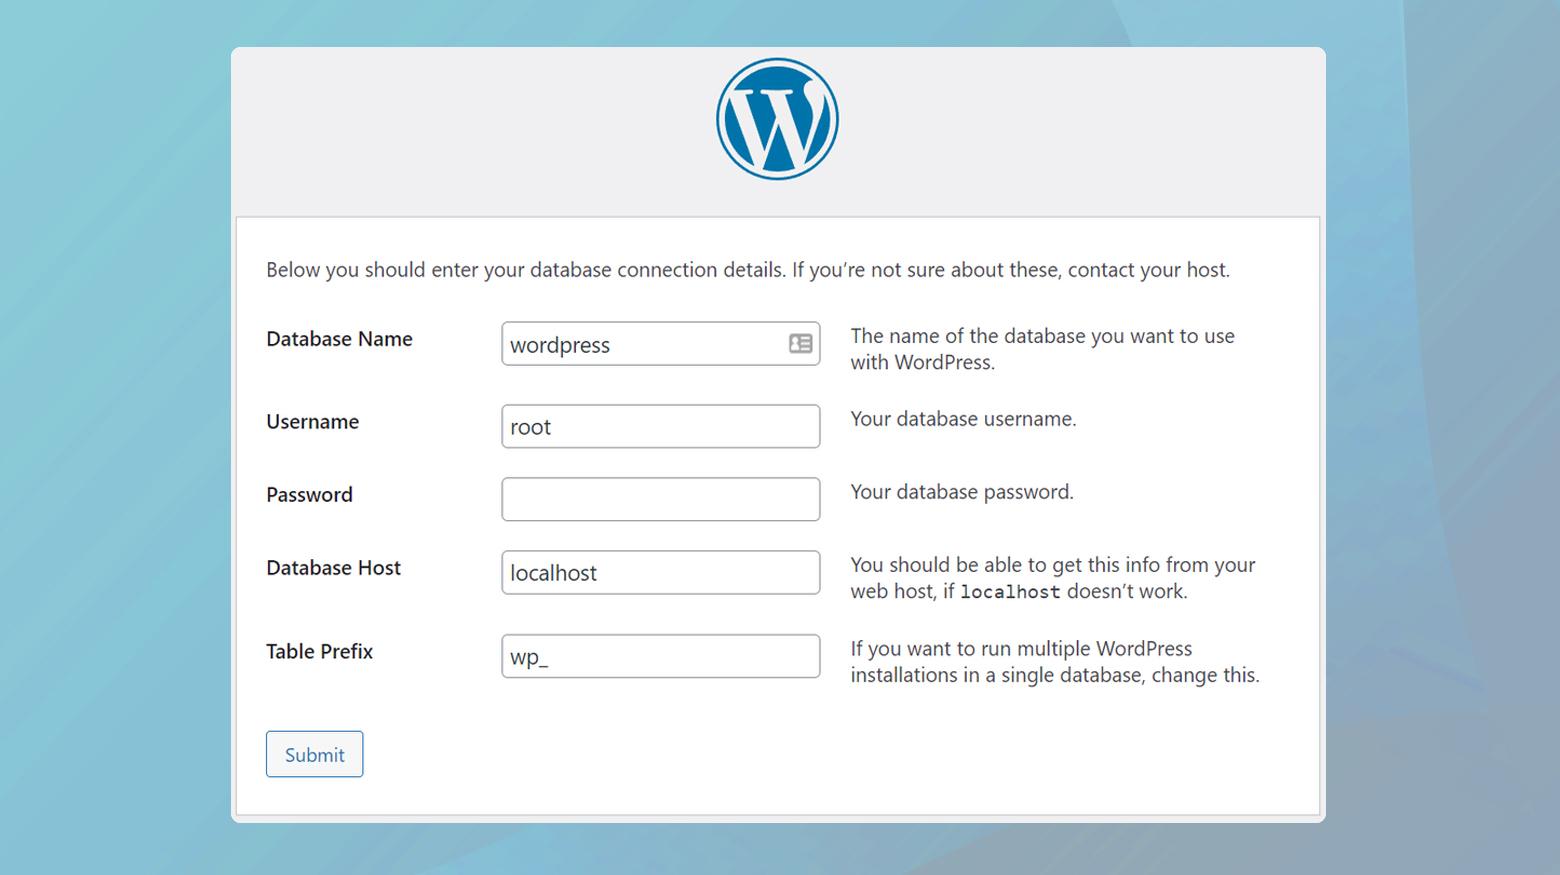
Step 4: Configure wp-config.php
In the WordPress files you uploaded, find the file named wp-config-sample.php and rename it to wp-config.php. Open this file in a text editor and fill in the database details you created earlier:
Setting
Example
DB_NAME
‘database_name_here’
DB_USER
‘username_here’
DB_PASSWORD
‘password_here’
DB_HOST
‘localhost’
Save the changes once you’ve entered your details.
Step 5: Run the Installation
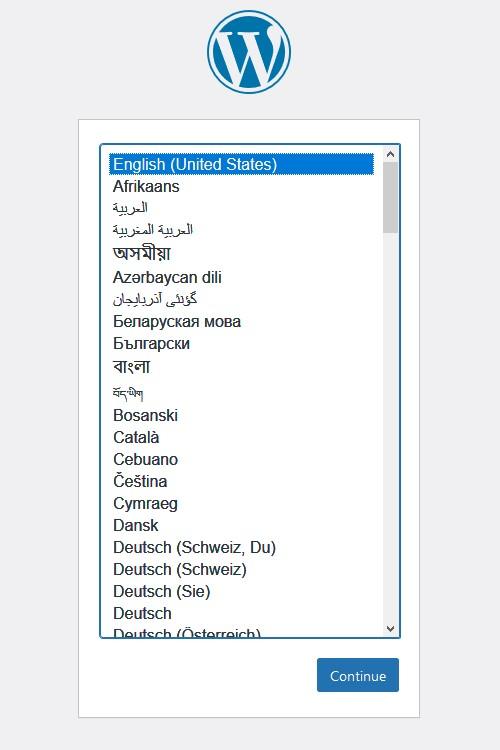
In your web browser, go to your domain name (e.g., http://yourdomain.com). You should see the WordPress installation page. Choose your preferred language, then click Continue. Fill out the site title, username, password, and your email address to set up your WordPress site.
Once you complete the form, click Install WordPress. After the installation is complete, you’ll see a success message. You can now log in to your new WordPress site using the credentials you created!
Congratulations! You’ve just installed WordPress manually. This method not only familiarizes you with the technical side of your website but also lays the groundwork for a solid foundation as you develop and customize your site further.
Preparing Your Server and Database for Manual Installation
Before diving into the manual installation process of WordPress, it’s essential to ensure your server and database are properly prepared. This step is crucial as it sets the foundation for a smooth installation experience. Let’s break down the necessary preparations you need to make.
First, you’ll need to select a reliable hosting provider that meets the minimum requirements for WordPress. Ensure your server environment includes:
PHP version: 7.4 or greater
MySQL version: 5.6 or greater, or MariaDB version 10.1 or greater
HTTPS support: SSL certificate for secure connections
Once you’ve secured a hosting plan, the next step is to set up your database. Most hosting services provide easy-to-use interfaces for this. Here’s a brief guide:
Step
Action
1
Log into your hosting control panel.
2
Locate the MySQL databases section.
3
Create a new database.
4
Create a new MySQL user and assign it to the database.
5
Grant all privileges to the user for full access.
When creating your database and user, it’s essential to use strong passwords and remember to document your database name, username, and password. This information will be necessary for the WordPress configuration process.
After setting up your database, ensure that your server has the required extensions for WordPress to function properly. These typically include:
cURL: for making HTTP requests
mbstring: for handling multibyte strings
OpenSSL: for secure communications
Lastly, consider enabling pretty permalinks to enhance your site’s SEO and user experience. You can do this in your WordPress settings after installation, but it’s good to have this in mind as you prepare your server.
By completing these preparatory steps, you’ll set yourself up for a successful manual installation of WordPress. With a well-prepared server and database, you’ll be ready to move on to the actual installation process, where the fun of building your website truly begins!
Step-by-Step Guide to Uploading WordPress Files
Uploading files to your WordPress site is an essential step in the installation process. Whether you’re using a local server or a web hosting service, knowing how to upload your WordPress files correctly can make all the difference. Let’s walk through the steps to ensure your installation goes smoothly.
First, you need to download the latest version of WordPress from the official website. This file will be in a compressed format, usually a .zip file. Once downloaded, extract the contents of this .zip file to a folder on your computer. You will see multiple files and folders, including wp-admin, wp-content, and wp-includes.
Cyberduck – A user-friendly option for Mac users.
WinSCP – Great for Windows users.
Once you have selected and installed an FTP client, open it and connect to your web server. You will need your FTP credentials, which you can typically find in your hosting account. Enter the server address, username, and password to connect.
After successfully connecting, you’ll see two panes: one for your local files and one for your server. Navigate to the local folder where you extracted the WordPress files and select all of them. Then drag and drop these files into the root directory of your server, usually named public_html or www.
During the upload process, you may encounter a few prompts or warnings about overwriting files. If it’s your first upload, it’s safe to proceed and replace any existing files. Depending on your internet speed, this process could take a few minutes.
To ensure everything was uploaded correctly, check the file structure on your server after the upload completes. You should see the same folders (like wp-admin, wp-content, and wp-includes) that were present in your local folder.
In case you are using a web hosting service with a control panel like cPanel, you might consider using the built-in File Manager to upload the WordPress files. Just navigate to the root directory, use the upload feature, and select the .zip file you downloaded earlier. After uploading, extract the files directly on the server.
Now that your WordPress files are uploaded, it’s time to set up your database and configure your wp-config.php file. This will allow your WordPress site to communicate with your database and ensure it runs smoothly.
Following these steps will prepare your WordPress site for the installation wizard, bringing you one step closer to launching your website. Remember, careful uploads can prevent future issues and ensure a seamless setup.
Configuring Your wp-config.php File with Ease
When it comes to setting up WordPress, the wp-config.php file is your best friend. This particular file is the heart of your WordPress installation, handling crucial configuration settings. But fear not! Configuring it is easier than you might think. Let’s dive into how you can do this effortlessly.
First things first, you can locate the wp-config.php file in the root directory of your WordPress installation. If you’ve just installed WordPress, you might not see it right away; instead, you may see a wp-config-sample.php file. No worries! Simply rename it to wp-config.php and open it for editing.
One of the main sections you’ll want to customize is your database connection settings. This is where you’ll provide your database name, username, password, and host. Here’s a quick breakdown:
Configuration
Example
Database Name
my_database
Username
root
Password
mypassword
Host
localhost
Once you’ve filled in these details, you’ll want to set unique security keys for your WordPress installation. This enhances the security of your site by encrypting information stored in user cookies. You can generate your keys using the WordPress.org secret key generator. Just copy and paste these keys into the appropriate section of your wp-config.php file.
Next, consider adjusting the table prefix to something unique. By default, WordPress uses wp_, which is common and can make your site vulnerable to SQL injection attacks. Change it to something like mycustomprefix_ to enhance your site’s security.
Enable Debugging Mode: While setting up your site, enable debugging to catch any issues. Change define('WP_DEBUG', false); to define('WP_DEBUG', true);.
Set the WordPress Language: Customize your site by defining the language you want to use. Add define('WPLANG', 'en_US'); for English, for instance.
Control Memory Limit: If you find your site is running slow, you might want to increase the memory limit. Use define('WP_MEMORY_LIMIT', '256M'); to allocate more resources.
After making these changes, save your wp-config.php file and close it. Your WordPress installation is now more secure and tailored to your needs. With a little bit of configuration, you can enhance both the performance and security of your website. The beauty of WordPress is that it’s user-friendly, and configuring your wp-config.php file is just another step in the process of creating a site that’s uniquely yours.
Running the Installation Script and Finalizing Your Setup
Once you’ve uploaded the WordPress files to your server, it’s time to run the installation script. This is a straightforward process that will guide you through the essential steps to get your WordPress site up and running.
To initiate the installation, open your web browser and enter your domain name, followed by /wp-admin/install.php. If everything is set up correctly, you should be greeted with the WordPress installation welcome screen. Here’s what to expect:
Select Your Language: Choose the language you want to use for your WordPress dashboard and click Continue.
Site Title: Enter a descriptive title for your site. This will appear in the header of your website.
Username: Create a unique username for your admin account. Avoid using “admin” for security reasons.
Password: Choose a strong password to protect your site. WordPress will indicate the strength of your password.
Your Email: Provide an email address where you can receive important notifications and updates.
Search Engine Visibility: Decide whether you want to discourage search engines from indexing your site during development.
After filling in the necessary information, click the Install WordPress button. WordPress will then process your request and create the database tables needed for your site, which typically takes just a few moments.
Once the installation is complete, you’ll see a success message along with a link to log in to your new WordPress dashboard. It’s crucial to keep your login details secure, so consider saving them in a password manager.
Now that you’re logged in, you can start customizing your site. Here are some initial steps you might consider:
Choose a Theme: Navigate to Appearance > Themes to explore and install a theme that suits your style.
Install Essential Plugins: Go to Plugins > Add New to search for and install plugins that enhance functionality.
Configure Settings: Adjust your site settings by visiting Settings to set up your site title, timezone, and permalink structure.
If you’re inclined to dive deeper into customization, consider the following table for essential plugins that every WordPress site should consider:
With these steps completed, you’re well on your way to establishing a fully functional WordPress site. The journey doesn’t end here; the real fun begins as you start creating content, building out your pages, and engaging with your audience!
Essential Plugins to Enhance Your New WordPress Site
Once you’ve set up your WordPress site, the next step to ensure it truly shines is to enhance its functionality with plugins. These handy tools can help you optimize your site, improve user experience, and even boost your SEO. Here are some essential plugins that every new WordPress site should consider:
Yoast SEO - This plugin is a must-have for any website aiming to enhance its search engine visibility. It provides tools for optimizing your content, managing keywords, and creating XML sitemaps.
Akismet Anti-Spam - Protect your blog from spam comments with Akismet. It checks your comments against a global database of spam to keep your site clean and professional.
WooCommerce – If you’re planning to sell products or services, WooCommerce is the go-to plugin for creating a fully functional online store.
Elementor - Build custom page layouts without touching a line of code. This drag-and-drop page builder allows you to create stunning pages that reflect your brand’s style.
UpdraftPlus – Backup and restore your site with ease using UpdraftPlus. This plugin allows you to schedule backups and store them in the cloud, ensuring your work is always safe.
Let’s take a closer look at a few key plugins:
Plugin
Purpose
Benefits
Yoast SEO
Search Engine Optimization
Improves visibility on search engines, user-friendly interface.
Transforms your site into an online store, customizable options.
Elementor
Page Builder
Easy drag-and-drop interface, no coding required.
UpdraftPlus
Backup Solution
Automatic backups, easy restoration process.
By selecting the right plugins, you can tailor your WordPress site to fit your specific needs. Each plugin offers a unique feature set that can transform how visitors interact with your site. The key is to choose plugins that enhance performance without compromising speed.
Remember, while plugins are incredibly useful, too many can slow down your site. It’s advisable to regularly audit your plugins and remove any that you are not using. This keeps your site optimized and running smoothly.
investing time into selecting and configuring these essential plugins will not only improve your site’s functionality but also enhance the overall user experience. As your site grows, so can your plugin selections, allowing you to adapt and evolve with your audience’s needs.
Customizing Your Theme: Making Your WordPress Site Stand Out
Your WordPress theme sets the tone for your entire website, and customizing it is key to ensuring it reflects your unique brand identity. With thousands of themes available, the challenge lies in making yours distinctive. Here’s how you can enhance your site’s aesthetics and functionality to captivate your audience.
Choose the Right Theme
Before diving into customization, selecting the right theme is crucial. Look for a theme that aligns with your niche and offers the flexibility you need. Consider the following options:
Responsive Design: Ensure your theme looks great on all devices.
Customization Options: Look for themes that offer extensive customization settings.
Compatibility: Make sure the theme works seamlessly with popular plugins.
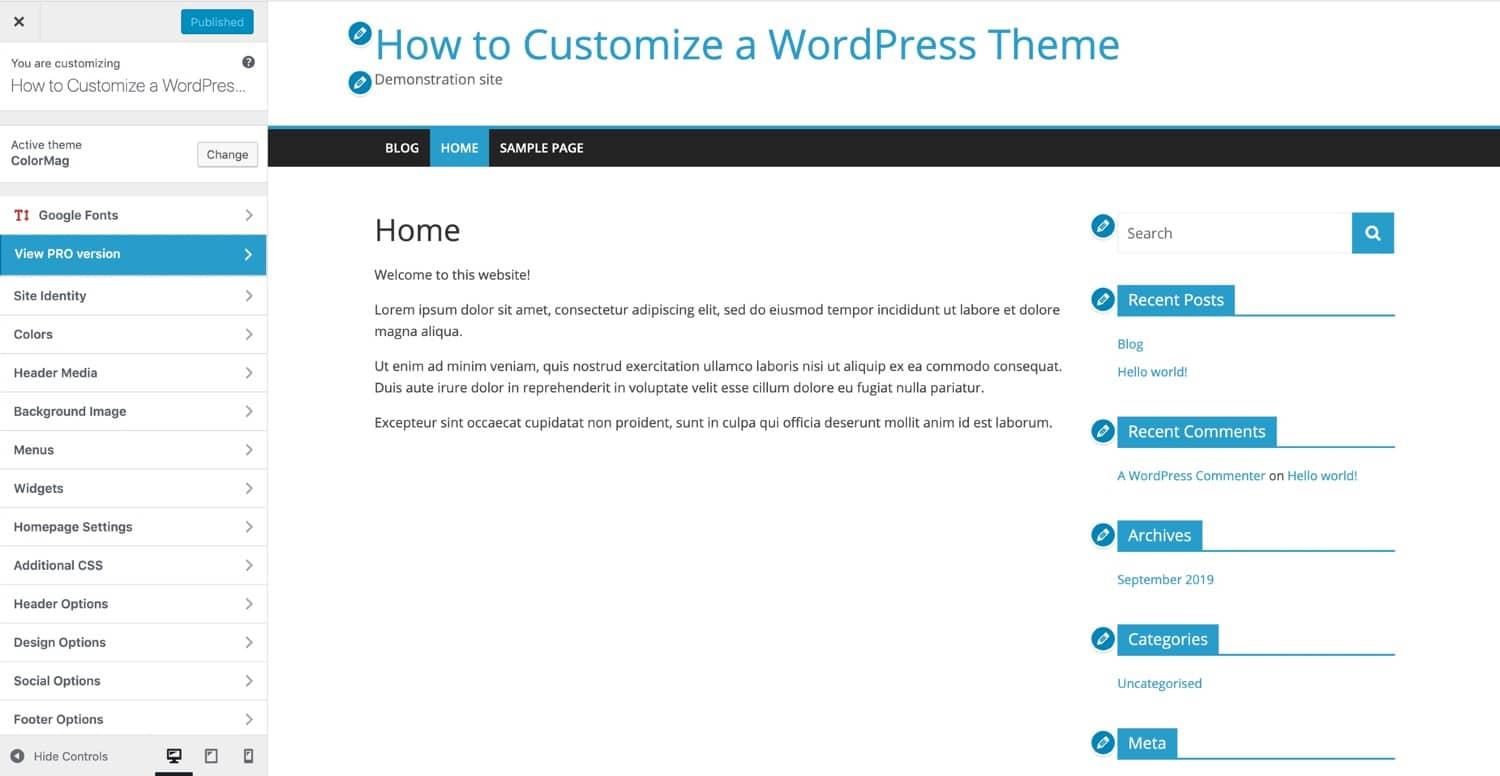
Utilize the WordPress Customizer
The WordPress Customizer offers an intuitive way to tweak your theme. Access it through your dashboard by navigating to Appearance > Customize. Here, you can modify:
Site Identity: Upload your logo, set the site title, and tagline.
Colors: Adjust the color scheme to match your brand.
Menus: Create and manage navigation menus easily.
Widgets: Add features like recent posts, search bars, or custom HTML.
Custom CSS for Unique Touches
If you have some coding knowledge, adding custom CSS can elevate your site’s design. You can target specific elements and adjust styles to make your site truly one-of-a-kind. For instance:
    /* Change the background color of the footer */
    footer {
        background-color: #333;
        color: #fff;
    }
    /* Customize button styles */
    .btn {
        background-color: #ff5722;
        border-radius: 5px;
        padding: 10px 20px;
    }
Use Plugins for Advanced Features
Plugins can expand your theme’s functionality without the need for extensive coding. Here are some must-have plugins for customization:
Elementor: A drag-and-drop page builder that allows you to design stunning layouts.
Yoast SEO: Optimize your site’s content for search engines effortlessly.
WPForms: Create custom forms to enhance user interaction and feedback.
Table of Essential Plugins
Plugin
Functionality
Elementor
Page builder for custom layouts
Yoast SEO
Search engine optimization
WPForms
Custom form creation
Final Touches for a Cohesive Look
Once you’ve made significant changes, it’s important to step back and ensure everything flows well together. Pay attention to:
Font Pairings: Choose fonts that are easy to read and complement each other.
Image Quality: Use high-quality images that enhance your content.
Spacing and Alignment: Ensure your layout is visually appealing and organized.
By thoughtfully customizing your theme, you can create a WordPress site that not only stands out but also engages your visitors. Take the time to explore various options and make adjustments that resonate with your audience, and you’ll see the difference in user engagement and satisfaction.
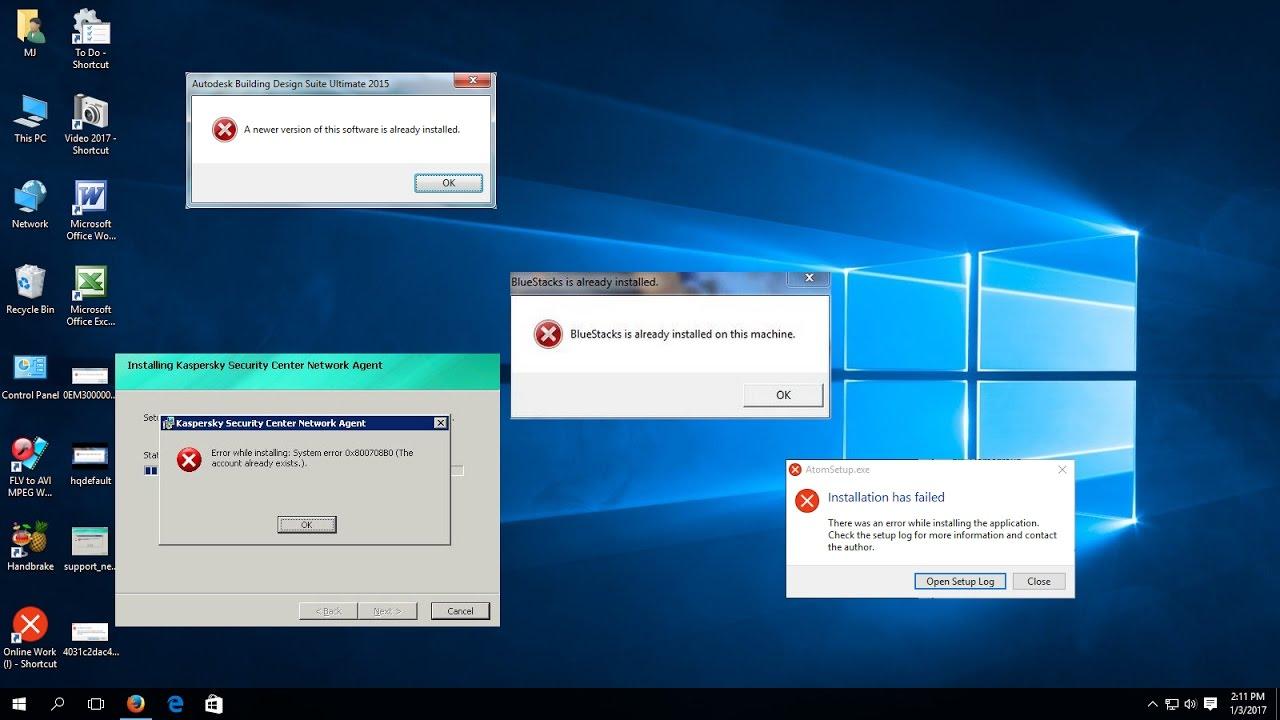
Troubleshooting Common Installation Issues
Installing WordPress can sometimes be a smooth process, but there are instances where you may encounter hurdles. The good news is that most issues can be resolved with a little troubleshooting. Here are some common problems and their solutions to help you get past any glitches you may face.
1. Error Establishing Database Connection
This issue usually occurs when WordPress cannot connect to the database. Here’s how to tackle it:
Check your wp-config.php file: Ensure the database name, username, and password are correct.
MySQL Server: Verify that the MySQL server is running and reachable.
Database User Privileges: Make sure the user has the right permissions for the database.
2. White Screen of Death
If your website displays a blank white page, it can be frustrating. This can be caused by several factors:
Plugin Conflicts: Disable all plugins by renaming the plugins folder via FTP.
Theme Issues: Switch to a default theme to check if the issue lies with your current theme.
Insufficient Memory: Increase the PHP memory limit in your wp-config.php file.
3. 404 Errors on Pages
If your pages return a 404 error, it could be due to permalink settings. Here’s what to do:
Reset Permalinks: Go to Settings > Permalinks and simply click ‘Save Changes’ to refresh the settings.
Check .htaccess File: Ensure the .htaccess file is present in the root directory and contains the correct rewrite rules.
4. Stuck on Maintenance Mode
If your site is stuck in maintenance mode after an update, follow these steps:
Remove the .maintenance file: Connect to your site via FTP and delete the .maintenance file in the root directory.
Check for Pending Updates: Sometimes, an update might have crashed; verify and redo the update if necessary.
5. Browser Compatibility Issues
Sometimes, custom themes or plugins might not function correctly across all browsers. To resolve these:
Test in Different Browsers: Use tools like CrossBrowserTesting to see how your site performs across browsers.
Update Plugins and Themes: Make sure everything is updated to the latest version that supports browser compatibility.
By following these troubleshooting steps, you can resolve most installation issues and get back to enjoying the benefits of your new WordPress site. Remember, the community is always here to help, so don’t hesitate to reach out if you find yourself stuck!
Congratulations! Tips for the Next Steps with Your WordPress Site
You’ve successfully installed WordPress—congratulations! Now that your site is up and running, it’s time to focus on what comes next. The foundation is laid, and your creativity can really take flight. Here are some invaluable tips to guide you through the next steps of enhancing your WordPress experience.
1. Choose the Right Theme
Your website’s theme sets the tone for your online presence. Spend some time browsing through the WordPress theme directory or premium theme marketplaces. When selecting a theme, consider the following:
Responsiveness: Ensure the theme looks great on both desktop and mobile devices.
Customization: Look for themes that allow you to tweak the design easily.
Support and Updates: Choose a theme that is regularly updated and has reliable support.
2. Install Essential Plugins
Plugins are like apps for your WordPress site, adding functionality and enhancing features. Here’s a list of must-have plugins to consider:
SEO Plugin: Optimize your site for search engines with plugins like Yoast SEO or Rank Math.
Security Plugin: Protect your site from threats using plugins like Wordfence or Sucuri.
Caching Plugin: Improve your site’s speed with caching plugins such as W3 Total Cache or WP Super Cache.
3. Create Compelling Content
Content is king! Start by creating a content plan that aligns with your audience’s interests. Focus on:
Engaging Blog Posts: Write informative articles that provide real value.
Visual Content: Use images, infographics, and videos to enhance your posts.
Regular Updates: Keep your content fresh by posting regularly.
4. Optimize for SEO
Search engine optimization (SEO) is crucial for driving traffic to your site. Consider these strategies:
Keyword Research: Use tools like Google Keyword Planner to find relevant keywords.
On-Page SEO: Optimize titles, headings, and meta descriptions for your posts.
Build Backlinks: Network with other websites to improve your site’s credibility.
5. Set Up Analytics
Tracking your site’s performance is essential. Google Analytics is a free tool that can provide insights into your visitor behavior. Here are some key metrics to monitor:
Metric
Description
Traffic Sources
See where your visitors are coming from.
Page Views
Track which content is the most popular.
Bounce Rate
Measure how many visitors leave after viewing only one page.
With these steps, you’ll be well on your way to creating a successful WordPress site. Remember, the journey is ongoing, and making adjustments along the way will help you grow and refine your online presence. Stay proactive, keep learning, and enjoy the process!
Frequently Asked Questions (FAQ)
Q&A: Step-by-Step How to Install WordPress (2 Methods)
Q: Why should I choose WordPress for my website? A: Great question! WordPress is one of the most popular content management systems out there, powering over 40% of the internet. It’s user-friendly, highly customizable, and offers thousands of themes and plugins to help you create a unique site that suits your needs. Plus, with a strong support community, you can find answers to almost any question. Whether you’re a blogger, a business owner, or an artist, WordPress has something for everyone!
Q: What are the two methods to install WordPress? A: The two main methods to install WordPress are the One-Click Installation method and the Manual Installation method. The one-click method is super easy and ideal for beginners, while the manual method gives you a little more control and is useful if you want to learn the ins and outs of WordPress installation.
Q: Can you explain the One-Click Installation method? A: Absolutely! This method is like pressing a magic button. Most web hosting providers offer this feature. After purchasing your hosting plan, you’ll usually find an option in your control panel for installing WordPress with just a click. You’ll fill out some basic information like your website name and admin credentials, and voilà — your WordPress site is ready to go!
Q: How about the Manual Installation method? What’s involved? A: Great follow-up! The manual method involves a few more steps, but it’s quite straightforward. You’ll need to download WordPress from the official website, upload the files to your hosting server using an FTP client, create a MySQL database, and then run the installation script. This method gives you insight into how WordPress works behind the scenes and can be very fulfilling once you see your site live!
Q: Is the manual method complicated? A: It might seem a bit daunting at first, but if you follow a step-by-step guide (like the one we provide in our article), you’ll find that it’s manageable! Plus, mastering this method will give you a deeper understanding of your website’s structure, which can be handy for troubleshooting down the line.
Q: Do I need technical skills to install WordPress? A: Not at all! If you choose the One-Click Installation method, you really just need to follow the prompts. Even the manual method is doable with a bit of patience and our easy-to-follow steps. Plus, there’s a ton of resources available to help you out if you get stuck.
Q: What should I do after installing WordPress? A: Once you’ve installed WordPress, it’s time to make it your own! Start by choosing a theme that reflects your style, install essential plugins to enhance functionality, and create your first few pages and posts. Don’t forget to explore the settings to optimize your site for search engines and user experience!
Q: Any final tips for new WordPress users? A: Definitely! Take your time to explore the WordPress dashboard, familiarize yourself with the features, and don’t hesitate to experiment. Also, keep your WordPress version, themes, and plugins updated for security and performance. Lastly, remember that the WordPress community is there to support you. Join forums, watch tutorials, and reach out for help when needed. You’ve got this!
Q: Where can I find your step-by-step guide for installing WordPress? A: You can find our comprehensive guide by checking out the article linked above! It’s packed with detailed instructions for both installation methods, along with helpful tips to get your site up and running smoothly. Happy blogging!
Wrapping Up
And there you have it! Whether you chose the one-click method or the manual installation route, you’ve taken a significant step toward building your own online presence with WordPress. It might seem a bit daunting at first, but trust us, the process is easier than it looks—and you’ve just proven that!
Now that WordPress is up and running, the real fun begins. Dive into customizing your site, exploring themes, and adding plugins to make your website truly yours. Remember, every great website started with a single click or keystroke, just like you did today.
If you run into any bumps along the way, don’t hesitate to reach out to the vibrant WordPress community for support. They’re always ready to help fellow enthusiasts like you. And who knows? You might even discover a passion for web design you never knew you had!
So go ahead—get creative, share your ideas, and watch your website grow. Your online journey is just beginning, and we can’t wait to see where it takes you. Happy blogging!