Are you ready to take your WooCommerce store to the next level? If you’re just starting out or looking to streamline your shipping process, understanding shipping classes can make a world of difference. Imagine offering your customers a seamless shopping experience, where shipping costs are accurately calculated based on the specific products they want. Sounds great, right? Well, that’s exactly what shipping classes in WooCommerce can do for you! In this article, we’ll break down the ins and outs of using shipping classes, making it easy for beginners like you to set up and manage your shipping options effectively. Whether you’re selling heavy machinery or delicate jewelry, shipping classes allow you to cater to different product types in a way that’s not only practical but also profitable. So, let’s dive in and unlock the potential of your WooCommerce store with the magic of shipping classes!
Understanding Shipping Classes and Their Importance in WooCommerce
Shipping classes in WooCommerce are fundamental to managing how your products are shipped and how shipping costs are calculated. They allow you to categorize your products based on shipping requirements, which can ultimately affect customer satisfaction and your bottom line. Understanding these classes is crucial for anyone looking to streamline their eCommerce operations.
Essentially, a shipping class is a way to group products that share similar shipping characteristics. For instance, heavy items may have different shipping costs compared to lightweight products. By assigning shipping classes to your products, you can set specific shipping rates that accurately reflect their shipping needs, ensuring that you don’t lose money on shipping costs.
Here’s a quick breakdown of how shipping classes can benefit your WooCommerce store:
- Custom Rates: You can create specific shipping rates for different classes, allowing for more accurate pricing.
- Promotions: You can offer free or discounted shipping for certain classes, helping you to boost sales.
- Better Management: Simplifies the management of shipping logistics by categorizing products based on size, weight, or type.
- Enhanced Customer Experience: By providing accurate shipping estimates, you improve the overall shopping experience.
To set up shipping classes, navigate to the WooCommerce settings and click on the “Shipping” tab. From there, you can define your classes and assign them to individual products. This process is straightforward but can significantly impact how your shipping is perceived by customers.
When creating shipping classes, it’s important to consider various factors such as:
- Weight of the products
- Size and dimensions
- Fragility of items
- Shipping destination
Here’s an example of a simple table showcasing different shipping classes and their corresponding rates:
| Shipping Class | Rate |
|---|---|
| Standard | $5.00 |
| Heavy Items | $15.00 |
| Fragile Items | $20.00 |
| Free Shipping | $0.00 |
Remember, the goal is to make your shipping as clear and efficient as possible. By defining shipping classes, you’re not only improving your operational efficiency but also enhancing trust with your customers. When they know exactly what to expect regarding shipping costs, they’re more likely to complete their purchases.
shipping classes are an indispensable tool for any WooCommerce store owner. They enable you to tailor the shipping experience to your customers, helping you to optimize costs and improve satisfaction. With just a bit of setup, you can transform your shipping process and make it work harder for your business.
Getting Started with WooCommerce Shipping Classes
When it comes to managing shipping in your WooCommerce store, shipping classes are a powerful tool that can streamline your shipping process and enhance the customer experience. They allow you to group different products together based on shipping requirements, making it easier to apply specific shipping rates based on the characteristics of the items being purchased.
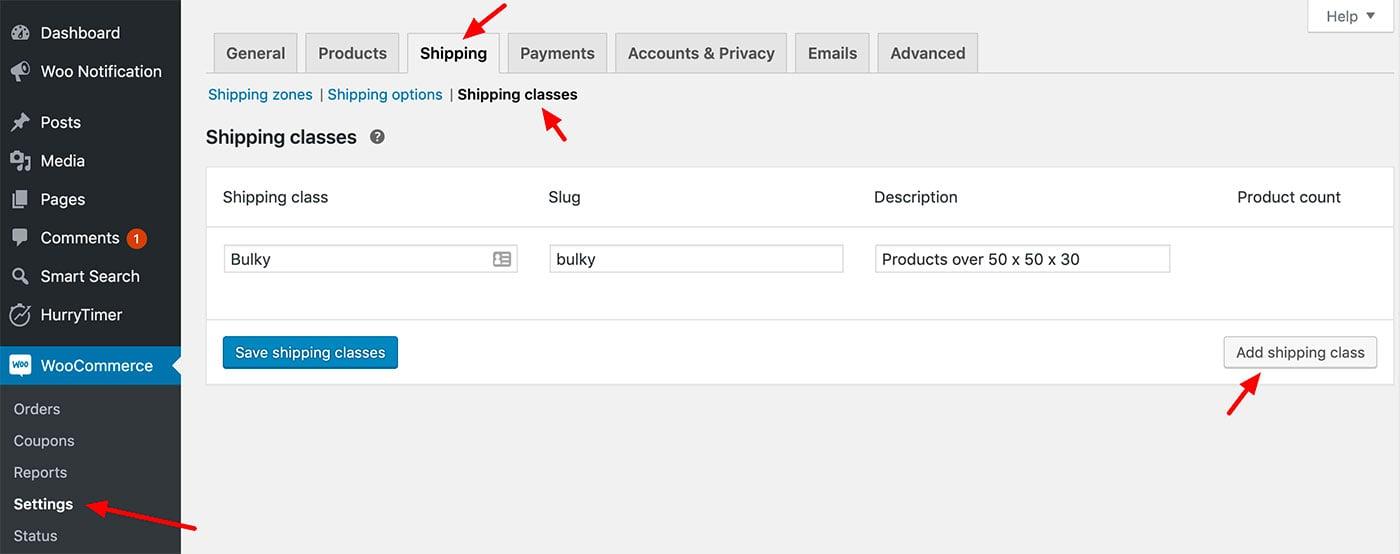
To get started with shipping classes, you’ll first want to navigate to WooCommerce > Settings > Shipping in your WordPress dashboard. From there, you can create and manage your shipping zones and methods. But let’s focus on shipping classes. Click on the Shipping Classes tab to add new classes that fit your products’ needs. Here are some tips to help you:
- Identify Product Groups: Think about the products you sell and how they should be shipped. For instance, you might have a shipping class for heavy items, fragile items, or even free shipping.
- Create Shipping Classes: Click on the ‘Add Shipping Class’ button and input a name, a slug, and a description for each class. This helps in setting clear expectations for you and your customers.
- Assign Classes to Products: Once you’ve created your shipping classes, you can assign them to individual products. Simply edit a product, scroll to the Shipping tab, and select the appropriate shipping class from the dropdown menu.
Next, you’ll need to set up the shipping rates for each class. Return to the Shipping Zones section and click on the zone where you want to apply your shipping classes. You’ll see the option to add a Shipping Method; choose this to define rates for each class. Here’s how to do it effectively:
| Shipping Class | Rate |
|---|---|
| Heavy Items | $20 |
| Fragile Items | $15 |
| Free Shipping | $0 |
Implementing these rates ensures that your customers are charged accurately based on what they are purchasing, ultimately leading to increased satisfaction. It’s crucial to test your shipping classes and rates before going live, ensuring that everything operates smoothly and as intended.
don’t forget to regularly review and adjust your shipping classes as your product offerings change. Keeping your shipping options fresh and relevant can help maintain customer satisfaction and improve your store’s efficiency. With a little attention and care, WooCommerce shipping classes can transform how you manage shipping logistics, making your operations more streamlined and effective.

How to Set Up Your First Shipping Class
Setting up your first shipping class in WooCommerce might sound daunting at first, but it’s quite straightforward once you break it down into manageable steps. Shipping classes enable you to group products to streamline your shipping rates based on specific criteria, such as weight, size, or type of product. Here’s how you can get started:
Step 1: Access Shipping Settings
To begin, navigate to your WordPress dashboard and go to WooCommerce > Settings. From the settings page, select the Shipping tab. Here, you’ll find the option to manage your shipping zones and classes.
Step 2: Create a New Shipping Class
Under the Shipping Classes section, you’ll see a button to Add Shipping Class. Click on this to open a new field where you can define your shipping class:
| Field | Description |
|---|---|
| Name | Your shipping class name (e.g., “Heavy Items”) |
| Slug | A URL-friendly version of the name. |
| Description | A brief description of what this class is for. |
Fill out these fields and then hit Save Shipping Classes to create your new class.
Step 3: Assign Products to Your Shipping Class
Now that you have your shipping class set up, it’s time to assign products to this class. Navigate to Products > All Products and select the product you want to edit. In the product data section, look for the Shipping tab. You’ll find a dropdown menu labeled Shipping Class, where you can select the class you just created.
Step 4: Configure Shipping Rates
After assigning your products, you’ll need to configure the shipping rates associated with your new class. Go back to the Shipping tab in WooCommerce settings and select the appropriate shipping zone. Add a new shipping method (like Flat Rate) and click on Edit. Here, you can set specific costs for the shipping class you created:
- Flat Rate: Set a standard charge for shipping items within this class.
- Free Shipping: Offer free shipping for selected items.
- Local Pickup: Allow customers to pick up items directly from your storefront.
Step 5: Test Your Shipping Class
it’s essential to test that everything works as intended. Add a product from the shipping class to your cart and proceed to checkout. Ensure the correct shipping charges reflect based on the shipping class assigned. If you spot any discrepancies, revisit your settings to make necessary adjustments.
Assigning Shipping Classes to Your Products
in WooCommerce is a game changer for managing your online store’s shipping strategies. With shipping classes, you can group products that share similar shipping needs, allowing for an organized and efficient handling of shipping costs.
To get started, navigate to WooCommerce > Settings > Shipping. Here, you’ll find the option to create new shipping classes. This is where you can define different classes based on your shipping requirements. Think about your products: Do some require special handling? Are there size or weight considerations? These factors will help you determine how to categorize your shipping classes.
Once you’ve created your shipping classes, it’s time to assign them to your products. You can do this directly from the product editing screen:
- Edit the product you want to assign a shipping class to.
- In the Product data section, navigate to the Shipping tab.
- Select the appropriate shipping class from the dropdown menu.
- Don’t forget to update the product!
Remember, organizing your shipping classes doesn’t just help you; it also enhances the customer experience. For example, if you have fragile items, creating a specific class can ensure that these items are clearly marked during shipping, potentially reducing damage and returns.
Another powerful feature of shipping classes is the ability to set different shipping rates for each class. This can be particularly useful if you’re selling a mix of lightweight and bulky items. By customizing shipping rates per class, you can:
- Encourage purchases of multiple products without scaring customers away with high shipping costs.
- Provide promotions for specific classes during sales events.
- Ensure that shipping costs accurately reflect the actual expenses incurred.
For clarity, here’s a quick table summarizing how different shipping classes can optimize your pricing strategy:
| Shipping Class | Typical Products | Suggested Rate |
|---|---|---|
| Standard | Books, Clothing | $5.00 |
| Fragile | Glassware, Electronics | $12.00 |
| Bulky | Furniture, Appliances | $25.00 |
efficiently not only simplifies your logistics but also provides a tailored experience for your customers. With thoughtful consideration, you’ll find that this feature transforms how you handle shipping in your WooCommerce store, making it a vital tool in your eCommerce toolkit.
Creating Multiple Shipping Classes for Different Needs
When running an online store, one of the keys to maintaining customer satisfaction is providing flexible shipping options. By creating multiple shipping classes, you can cater to various customer needs and enhance their shopping experience. Whether you sell lightweight items or bulky products, the right shipping classes can make a significant difference in your operations and customer perceptions.
To get started, think about the different types of products you offer. For example, you might have:
- Standard Products: Items that fit into typical shipping rates.
- Heavy Items: Larger products that require special handling or different rates.
- Fragile Goods: Items that need extra care during shipping.
- Digital Products: Offer free shipping or no shipping class at all.
Once you have identified these categories, head over to your WooCommerce settings. Under the Shipping tab, you can create new shipping classes. This allows you to assign specific rates and methods to each class, ensuring that customers see only the relevant options at checkout.
For instance, if you sell both books and furniture, you can create two distinct classes:
| Shipping Class | Rate |
|---|---|
| Books | $5 Flat Rate |
| Furniture | $50 Flat Rate |
By doing this, you’re not only providing clarity but also being transparent about shipping costs. Customers appreciate knowing exactly what they’ll pay, which can lead to increased trust and loyalty towards your brand.
Another great benefit of using shipping classes is the ability to offer promotions. For example, you could run a campaign that offers free shipping on all fragile goods over a certain amount. This tactic not only encourages higher spending but also highlights your commitment to customer satisfaction.
don’t forget to test your shipping classes thoroughly. Place test orders to see how the shipping options appear at checkout. Ensure that everything works seamlessly and that your customers have a smooth experience. By implementing these strategies, you’ll be well on your way to mastering WooCommerce shipping classes and enhancing your online store’s functionality.
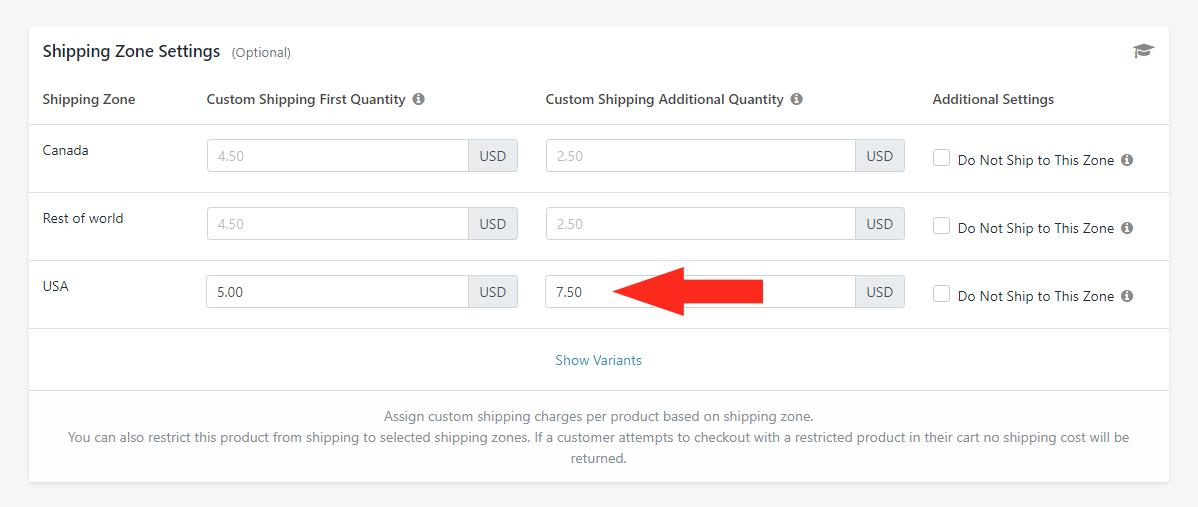
Customizing Shipping Rates for Each Shipping Class
Customizing shipping rates for different shipping classes in WooCommerce can significantly enhance the shopping experience for your customers. By tailoring shipping fees based on product types, you can ensure that each item is fairly represented. This not only builds trust but also encourages higher conversions. Here’s how you can set it all up.
First, you’ll want to navigate to the WooCommerce settings in your WordPress dashboard. From there, click on the Shipping tab. Here, you can see your current shipping zones and methods. For each zone, you can add various shipping methods tailored to your shipping classes. This allows you to create a more flexible shipping strategy.
Next, you need to create or edit your shipping classes. Go to WooCommerce > Settings > Shipping > Shipping Classes. Here, you can add new classes that represent different product types. For example:
- Standard Items: Regular shipping rates apply.
- Heavy Items: Increased shipping rates due to weight.
- Fragile Items: Special handling fees added.
Once your classes are set up, it’s time to assign them to your products. While editing a product, scroll down to the Product Data section and select the corresponding shipping class. This step ensures that each product is categorized correctly for shipping purposes.
Now, let’s talk about adjusting the shipping rates. Within each shipping zone, you can add a new shipping method. For example, if you’re using the Flat Rate method, you can edit its settings to apply different rates for each shipping class. Here’s a simple way to set up your rates:
| Shipping Class | Flat Rate |
|---|---|
| Standard Items | $5.00 |
| Heavy Items | $15.00 |
| Fragile Items | $10.00 |
With these configurations, customers will see accurate shipping costs calculated based on the items in their cart. Moreover, WooCommerce allows you to take it a step further by incorporating conditional shipping logic through additional plugins. This means you can implement rules like free shipping on specific classes, volume discounts, or even geographical restrictions.
Don’t forget to test your settings! Place a few test orders featuring different combinations of shipping classes to ensure everything is working as intended. This way, you can confirm that your customers receive the correct shipping rates based on their selections, ultimately leading to a smoother checkout experience.
Real-World Examples of Effective Shipping Class Use
When implementing shipping classes in WooCommerce, it’s beneficial to take cues from businesses that have successfully navigated this landscape. Here are some real-world examples that illustrate the power of effective shipping class use:
- Online Clothing Retailer: A popular clothing store uses shipping classes to differentiate between regular and heavy items. By assigning a higher shipping rate to bulky items like coats and shoes, they ensure that the shipping costs reflect the actual expenses incurred. This not only improves profit margins but also provides transparency to customers.
- Gourmet Food Shop: A gourmet food company sells perishable items that require expedited shipping. They created a specialized shipping class for perishables to ensure products arrive fresh. Customers can see the higher shipping cost at checkout, which is justified by the quality of the product, leading to increased trust and customer satisfaction.
- Electronics Retailer: An electronics retailer uses shipping classes to offer free shipping on smaller items while charging a premium for heavier tech gadgets. By strategically positioning free shipping as a promotional tool for smaller, high-margin products, they effectively drive sales while managing shipping costs efficiently.
To visualize this approach, consider the following table that summarizes how different businesses implement their shipping classes:
| Business Type | Shipping Class | Shipping Strategy |
|---|---|---|
| Online Clothing Retailer | Regular & Heavy Items | Higher rates for heavier items to cover costs. |
| Gourmet Food Shop | Perishables | Expedited shipping to ensure freshness. |
| Electronics Retailer | Small & Heavy Electronics | Free shipping on small items, premium on heavy gadgets. |
These examples demonstrate that the strategic use of shipping classes can lead to enhanced customer experiences and better alignment of costs with profits. Customers appreciate the clarity in shipping options, which empowers them to make informed decisions based on delivery timeframes and costs.
- National Bookstore: A national bookstore chain assigns shipping classes based on the type of book and weight. They leverage a flat-rate shipping option for standard paperbacks while using a weight-based approach for heavier hardcover editions, allowing for a smooth checkout process without unexpected fees.
- Health and Beauty Products: A health and beauty retailer categorizes items like skincare and cosmetics into shipping classes based on fragility. Products that require extra cushioning or special handling attract a higher shipping fee, helping the company maintain product integrity and minimize returns.
Incorporating these practical insights, you’ll find it easier to tailor your shipping strategies in WooCommerce, ensuring that your customers receive their orders promptly and at a price that reflects their value. The key lies in understanding your product lineup, customer expectations, and creating a shipping structure that supports your business goals.
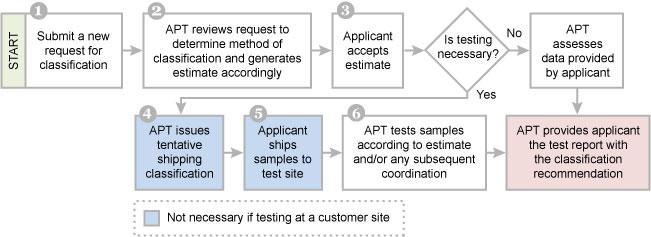
Troubleshooting Common Shipping Class Issues
Using shipping classes in WooCommerce can streamline your shipping options, but sometimes things don’t go as planned. Here are some common issues you might encounter and how to resolve them.
Incorrect Shipping Class Assignment: One of the most frequent problems arises when products are not assigned to the correct shipping class. Double-check the following:
- Navigate to the product edit page.
- Ensure the correct shipping class is selected in the ‘Shipping’ tab.
- Update the product to apply any changes.
Shipping Class Not Recognized: If you have set up a shipping class but it isn’t being recognized during checkout, consider these steps:
- Go to WooCommerce > Settings > Shipping.
- Select the relevant shipping zone and method.
- Make sure the shipping class is added to the method settings.
Conflicts with Flat Rate Shipping: Sometimes, flat rate shipping can conflict with shipping classes. If you notice discrepancies in shipping costs, check the following:
- Review your flat rate settings for adjustments based on weight or quantity.
- Consider tweaking the shipping class rates to ensure they align properly.
Shipping Class Visibility: Are your shipping classes visible to customers during checkout? Here’s what to do:
- Ensure that your shipping classes are enabled in the shipping settings.
- Test different products in the cart to see if classes apply correctly.
| Issue | Potential Cause | Solution |
|---|---|---|
| Incorrect Shipping Cost | Wrong shipping class assigned | Reassign the correct class |
| Class Not Applied | Settings not saved | Revisit settings and update |
| Shipping Method Missing | Zone configuration issue | Add or edit the shipping method |
By staying vigilant about these common shipping class issues, you can enhance the customer experience while ensuring your WooCommerce store operates smoothly. Always remember to test changes by placing a sample order to verify that everything functions as intended.
Tips for Optimizing Your Shipping Strategy
When it comes to enhancing your shipping strategy in WooCommerce, understanding how to leverage shipping classes is essential. Here are some actionable tips to optimize your approach and streamline your logistics:
- Define Clear Shipping Classes: Create specific shipping classes tailored to different products. This allows you to charge different rates based on size, weight, or delivery speed, ensuring a fair approach that reflects the actual shipping costs.
- Utilize Flat Rate Shipping: Implement flat-rate shipping options for certain shipping classes. This not only simplifies the checkout process for customers but also helps you manage expectations regarding shipping costs.
- Incorporate Free Shipping Thresholds: Encourage larger purchases by offering free shipping for orders over a certain amount. This tactic can significantly boost your average order value while keeping customers happy.
- Regularly Review Shipping Rates: Stay competitive by frequently assessing your shipping rates. Use real-time data to adjust costs based on carrier rates, seasonal changes, or promotions to ensure you’re always offering the best value.
- Test Multiple Shipping Options: Don’t hesitate to experiment with various shipping methods. Analyze which options lead to higher conversion rates and customer satisfaction, then standardize the most effective methods.
To further streamline your process, consider the following integration methods:
| Integration Method | Benefits |
|---|---|
| Third-Party Shipping Plugins | Automate rates, print labels, and track shipments in one go. |
| Local Pickup Options | Reduce shipping costs and offer convenience for local customers. |
| Shipping Carrier APIs | Get real-time shipping rates and delivery estimates directly on your site. |
Another crucial aspect is to ensure that your shipping policies are transparent. Providing clear information about shipping times, costs, and policies will build trust with your customers.
- Communicate Shipping Times: Clearly state the estimated delivery times for each shipping class. Customers appreciate transparency and are more likely to complete their purchase if they know when to expect their order.
- Set Up Shipping Notifications: Use automated notifications to keep customers informed at every stage of the shipping process. This includes confirmation emails, shipping updates, and delivery notifications, enhancing the overall customer experience.
Lastly, don’t underestimate the power of analytics. Regularly monitor your shipping performance metrics to identify trends and areas for improvement. By analyzing data from WooCommerce, you can make informed decisions that enhance your shipping strategy and ultimately contribute to higher customer satisfaction.
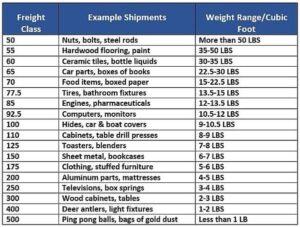
Integrating Shipping Classes with Popular WooCommerce Plugins
can significantly enhance your online store’s functionality, making it easier for customers to navigate shipping options and for you to manage shipping costs effectively. Here’s how to leverage some of the most used plugins alongside WooCommerce’s shipping classes.
First up, let’s talk about WooCommerce Table Rate Shipping. This plugin allows you to define multiple shipping rates based on various conditions, such as weight, number of items, or destination. By incorporating shipping classes, you can set specific rates for different product categories. For example, you might want to charge a premium rate for fragile items while offering free shipping on bulk orders. With the right configuration, this can lead to more satisfied customers and decreased cart abandonment rates.
Another useful tool is the WooCommerce Advanced Shipping plugin, which takes shipping customization to the next level. This plugin enables you to create advanced rules that consider shipping classes. For instance, you can set up a rule that applies a discount for customers purchasing multiple items from the same shipping class. This not only encourages bulk purchases but also streamlines the shipping process, making it easier for you to manage logistics.
If you’re using WooCommerce Memberships, consider how shipping classes can enhance the experience for your members. By assigning different shipping classes to membership tiers, you can offer exclusive shipping options or discounts to your loyal customers. For example, members might enjoy expedited shipping on certain products, while non-members pay standard rates. This creates a sense of value and exclusivity that can increase membership sign-ups.
When it comes to integrating with WooCommerce Subscriptions, shipping classes also play a vital role. You can customize the shipping experience for recurring orders based on the shipping class assigned to each product. This means you can automatically adjust shipping costs for subscription items, ensuring that your customers are always aware of what they will be charged during each billing cycle.
For those who utilize WooCommerce Product Bundles, remember that shipping classes apply to bundles as well. By setting specific shipping classes for bundles, you can create shipping strategies that maximize profits. For instance, if a bundle includes a high-value item, you might choose to charge a higher shipping rate or offer free shipping as an incentive. This flexibility allows you to tailor shipping options according to the unique characteristics of your bundled products.
| Plugin | Shipping Class Integration |
|---|---|
| WooCommerce Table Rate Shipping | Define rates by product category |
| WooCommerce Advanced Shipping | Create advanced rules with discounts |
| WooCommerce Memberships | Exclusive rates for members |
| WooCommerce Subscriptions | Adjust costs for recurring orders |
| WooCommerce Product Bundles | Custom rates based on bundle content |
Lastly, don’t forget about WooCommerce Shipping Calculator, which allows customers to calculate their shipping costs before checkout. By integrating shipping classes here, you can provide a more accurate shipping quote based on the class of the products in their cart. This transparency builds trust and can lead to higher conversion rates as customers feel more informed about their purchasing decisions.
By effectively integrating shipping classes with these popular WooCommerce plugins, you can not only streamline your shipping processes but also enhance the overall shopping experience for your customers. This thoughtful approach ultimately drives sales and fosters customer loyalty, making your WooCommerce store more competitive in the ever-evolving eCommerce landscape.
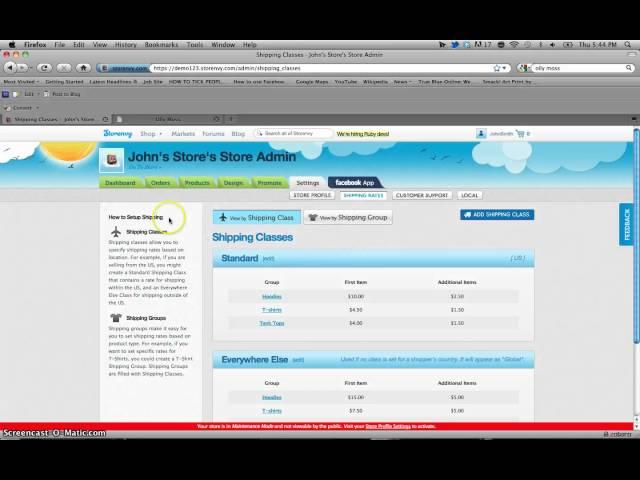
Testing Your Shipping Class Setup Before Going Live
Before you hit the “Go Live” button on your WooCommerce store, it’s crucial to ensure that your shipping class setup is functioning flawlessly. You wouldn’t want to face unexpected shipping costs or delays once your store is open for business. Let’s dive into some practical steps to help you test your shipping classes effectively.
First, create a series of test products. Assign each product a different shipping class that you’ve configured in WooCommerce. This allows you to see how each class behaves during the checkout process. Make sure to consider the following when setting up your test products:
- Variety: Include a mix of products that reflect your real inventory.
- Pricing: Use different price points to test how shipping costs scale.
- Weight and Dimensions: Create products that vary in size and weight to see how these factors affect shipping.
Once your test products are set up, it’s time to simulate a checkout experience. Go through the entire process as if you were a customer. Pay close attention to:
- Shipping Options: Verify that the correct shipping options appear for each product based on its assigned class.
- Cost Calculation: Ensure that the shipping costs are calculated accurately according to the rules you’ve set for each class.
- Checkout Flow: The transition from the cart to checkout should be seamless and intuitive.
After testing the checkout process, consider using the built-in WooCommerce tools to run reports on the shipping costs. This can help you identify any discrepancies or unusual charges that could discourage customers. Here’s a simple table to help you track your findings:
| Shipping Class | Expected Cost | Actual Cost | Status |
|---|---|---|---|
| Standard Shipping | $5.00 | $5.00 | Correct |
| Express Shipping | $15.00 | $18.00 | Incorrect |
| International Shipping | $25.00 | $25.00 | Correct |
Don’t forget to check your email notifications too. Make sure that the confirmation emails sent to customers reflect the correct shipping class and costs. This is not only important for transparency but also builds trust with your customers.
consider asking a few friends or family members to go through the checkout process on your site. They can provide fresh eyes and feedback on the user experience, which might uncover issues you hadn’t noticed. This step can be invaluable in fine-tuning your setup before you officially launch.
The Benefits of Offering Free Shipping by Class
Free shipping has become a powerful tool for eCommerce businesses, and when tailored by shipping class, it can significantly enhance customer satisfaction and boost sales. By offering free shipping on specific classes of products, you can effectively target your most profitable items, ensuring that both your customers and your bottom line benefit.
One of the primary advantages of implementing free shipping by class is the ability to attract different customer segments. Consider the following:
- Increased Conversion Rates: Customers are more likely to complete a purchase when they see free shipping as an option. By categorizing certain products under a shipping class that offers free shipping, you incentivize purchases that might otherwise be abandoned.
- Encourages Bulk Purchases: Offering free shipping on higher-value classes can urge customers to add more items to their carts to reach the threshold for free shipping. This strategy not only increases the average order value but also creates a more satisfying shopping experience.
- Competitive Edge: In a saturated market, providing free shipping on selected categories can set you apart from competitors who may not offer similar incentives, attracting potential customers to your store.
Moreover, free shipping by class allows for strategic marketing. You can promote specific products or collections that are particularly profitable or seasonal. For example, if you have a line of summer apparel, offering free shipping on that class can create urgency and encourage customers to buy before the season ends.
Another benefit is the flexibility in pricing strategies. By analyzing which products are frequently purchased together, you can create shipping classes that not only improve customer satisfaction but also promote high-margin items. This way, you can maintain profitability while enhancing the overall value proposition of your products.
Here’s a simple comparison table to illustrate the impact of offering free shipping by class:
| Shipping Class | Average Order Value | Conversion Rate | Customer Feedback |
|---|---|---|---|
| Standard Products | $30 | 3% | Neutral |
| Free Shipping on Apparel | $45 | 6% | Positive |
| Free Shipping on Electronics | $120 | 10% | Very Positive |
Ultimately, offering free shipping by class is not just a cost to your business; it’s an investment in customer loyalty and brand reputation. Tailoring your shipping strategy to meet customer expectations can lead to repeat purchases and long-term relationships. So, as you set up your shipping classes in WooCommerce, consider the potential benefits of this marketing tactic and watch your business thrive.

Keeping Your Customers Happy with Transparent Shipping Options
In today’s fast-paced e-commerce landscape, customer satisfaction hinges significantly on how transparent your shipping options are. Customers appreciate knowing exactly what to expect, and when it comes to shipping, clarity can make all the difference. By utilizing shipping classes in WooCommerce, you can create tailored shipping experiences that cater to various customer needs while keeping them informed every step of the way.
First off, it’s essential to categorize your products effectively. By using shipping classes, you can group similar products together based on their shipping requirements. This allows you to set specific rates and options for different types of products, ensuring that customers know what to expect in terms of delivery timelines and costs. For instance, you might have classes for:
- Standard Shipping – For everyday items with standard delivery times.
- Express Shipping – For urgent purchases that need faster delivery.
- Heavy Items - For bulky products that require special handling or higher shipping fees.
Moreover, transparency doesn’t just stop at the shipping classes. Once you’ve established these categories, make sure that customers can easily find shipping information throughout your site. A simple, well-structured table on your product pages can effectively communicate the available shipping options and their associated costs:
| Shipping Class | Delivery Time | Cost |
|---|---|---|
| Standard Shipping | 3-5 Business Days | $5.00 |
| Express Shipping | 1-2 Business Days | $15.00 |
| Heavy Items | 5-7 Business Days | $25.00 |
Another effective strategy is to provide real-time tracking for all shipments. This feature not only keeps customers in the loop but also reduces anxiety associated with online purchases. Incorporating tracking links in confirmation emails and on your website can help reassure customers that their orders are on the way. Consider adding a section in your user account area where they can easily monitor the status of their shipments.
Additionally, proactively communicating potential delays can significantly enhance customer trust. If you foresee a delay due to weather conditions or supply chain issues, let your customers know as soon as possible. Use email notifications or updates on your website to keep them informed. A little transparency goes a long way in building strong customer relationships.
Lastly, encourage customer feedback regarding your shipping options. You can include a simple survey or feedback form in your follow-up emails. This not only shows that you care about their experience but also provides valuable insights into how you can improve your shipping processes. Happy customers are more likely to return, and their feedback can guide you in refining your shipping strategy.
Final Thoughts on Mastering Shipping Classes in WooCommerce
Mastering shipping classes in WooCommerce can significantly enhance your eCommerce operations, making it easier to manage diverse shipping needs. With the right strategies, you can tailor your shipping methods to fit different products, ensuring that your customers have a smooth experience from cart to checkout.
Why Use Shipping Classes?
Shipping classes allow you to group products with similar shipping requirements. By utilizing this feature, you can:
- Set different rates: Charge varying shipping fees based on product type.
- Optimize shipping methods: Apply specific delivery methods that suit each product class.
- Enhance customer satisfaction: Provide accurate shipping costs that reflect the value and size of the items.
Creating and managing shipping classes is a straightforward process. Start by navigating to the WooCommerce settings in your WordPress dashboard. From there, you can easily add new shipping classes to fit your product catalog. Don’t forget to assign these classes to products when editing them so that the shipping calculations work seamlessly.
Tips for Effective Shipping Class Management
Consider incorporating these strategies to make the most out of your shipping classes:
- Analyze your products: Group similar items together to simplify your shipping strategy.
- Test different rates: Experiment with pricing to find what works best for your customers.
- Stay informed: Keep up with shipping trends and customer feedback to continuously refine your approach.
Additionally, utilizing a well-structured table can help you visualize your shipping classes and rates effectively:
| Shipping Class | Rate ($) | Delivery Method |
|---|---|---|
| Standard | 5.00 | Ground Shipping |
| Heavy Goods | 15.00 | Freight Shipping |
| Express | 25.00 | Overnight Shipping |
Remember that clarity is key. Clearly communicate shipping costs and delivery times on your product pages. This transparency builds trust and helps customers make informed decisions, reducing the likelihood of cart abandonment.
don’t underestimate the power of testing and optimization. Utilize analytics tools to track the performance of your shipping classes and adjust your strategies based on real data. By continually refining your approach, you’ll not only streamline operations but also boost customer satisfaction and loyalty.
Frequently Asked Questions (FAQ)
Q&A: How to Use Shipping Classes in WooCommerce: For Beginners
Q1: What are shipping classes in WooCommerce?
A: Great question! Shipping classes in WooCommerce are essentially categories that you can assign to your products. They help you group items based on their shipping requirements. For instance, you might have different rates for heavy items, fragile products, or free shipping for specific categories. By using shipping classes, you can provide a tailored shipping experience for your customers.
Q2: Why should I use shipping classes for my online store?
A: Using shipping classes is a game-changer for any online business! They allow you to set up more flexible and accurate shipping rates, which can significantly enhance customer satisfaction. Imagine a customer checking out and seeing just the right shipping cost based on the items in their cart—that’s a great way to leave a positive impression! Plus, it can help you save money by ensuring you’re not overcharging or undercharging for shipping based on product types.
Q3: How do I create shipping classes in WooCommerce?
A: Creating shipping classes is quite simple! First, navigate to your WooCommerce settings and click on the ”Shipping” tab. There, you’ll find an option for “Shipping Classes.” Click on it, and you’ll be able to add new classes. Just give each class a name and a description, and you’re good to go! Once created, you can assign these classes to specific products in their settings.
Q4: Can I assign multiple shipping classes to a product?
A: Unfortunately, you can only assign one shipping class per product. However, if you have products that fit into multiple categories, consider creating a shipping class that combines the needs of those products. This way, you can still provide a tailored shipping experience without overcomplicating things.
Q5: How do I set shipping rates for different classes?
A: Setting shipping rates for your classes is where the magic happens! After you’ve created your shipping classes, go back to the “Shipping Zones” section in your WooCommerce settings. Here, you can define shipping methods (like flat rate, free shipping, or local pickup) and set specific rates for each shipping class. This way, you can create unique pricing models that make sense for your business and your customers.
Q6: Can I use shipping classes for international shipping?
A: Absolutely! Shipping classes can be used for both domestic and international shipping. Just make sure to define separate shipping zones for international destinations and apply your shipping classes accordingly. This allows you to offer competitive rates globally while catering to the specific needs of different products.
Q7: What if I make a mistake in my shipping class settings?
A: No worries! WooCommerce lets you edit your shipping classes and their rates anytime. Just go back to the shipping settings, make your changes, and save. If you notice any issues after a customer has placed an order, you can also adjust shipping costs on a per-order basis if needed. Flexibility is key!
Q8: Is there anything else I should know about using shipping classes?
A: Definitely! Always keep an eye on your shipping settings and make adjustments based on customer feedback and shipping costs. Testing different shipping strategies can also help you find the sweet spot that maximizes both sales and customer satisfaction. Plus, don’t forget to promote any free shipping options you have—it can be a huge draw for potential buyers!
Using shipping classes in WooCommerce can elevate your online store by making the checkout process smoother and more customer-friendly. So why wait? Dive in and start optimizing your shipping strategy today!
Closing Remarks
Wrapping It Up: Mastering Shipping Classes in WooCommerce
And there you have it! You’re now equipped with the essential knowledge to make shipping classes work for you in WooCommerce. By understanding how to set up and utilize these classes effectively, you can tailor your shipping strategies to meet the unique needs of your products and customers.
Remember, shipping isn’t just a logistical detail—it’s a significant part of the shopping experience. The right shipping setup can enhance customer satisfaction, encourage repeat purchases, and ultimately boost your bottom line.
So, don’t hesitate to dive in and experiment with different shipping classes. Test them out, refine your approach, and watch how it transforms your store’s operations.
If you have any questions or need further assistance, feel free to reach out or explore more resources. Happy selling, and may your shipping be swift and your sales be soaring!


